Run Influencer Butler on a Free Cloud PC (AWS), Even on a Slow or Travel Laptop
A dead-simple, step-by-step guide to running Influencer Butler 24/7 on a free cloud computer, so your butlers keep working even when your laptop is slow, closed, or on a plane.
By The Influencer Butler Team · July 7, 2026 · 12 min read
If your computer is slow, old, or you are always on the go, this guide is for you. You are going to put Influencer Butler on a free computer that lives in the cloud and never turns off, so your butlers keep working around the clock, even when your own laptop is closed, dead, or in your bag on a plane.
The best part: you can do this for free. Amazon (yes, the same Amazon) rents out computers in its data centers, and it gives new users free credit and a free trial period to use them. So you get a fast, always-on computer for your butlers without paying a cent for months. No tech degree required. If you can follow a recipe, you can do this.
Let me walk you through it in plain English, one screenshot at a time.
What we are actually building (in normal-person words)
Think of it like renting a second computer that lives inside one of Amazon's buildings. It is always plugged in, always online, and it never sleeps. You connect to it from your own laptop or phone using a free app called Remote Desktop, and it feels just like sitting in front of a normal Windows computer. You install Influencer Butler on it once, log in, start your butlers, and then you can close your own laptop and walk away. The cloud computer keeps going.
Why this is perfect for slow or travel laptops:
- It is fast even if your laptop is not. The cloud computer does all the work. Your old laptop is just a window into it.
- It never gets interrupted. Close your lid, lose your wifi, hop on a flight: the cloud computer does not care. It keeps running your butlers.
- It is free to start. Amazon gives new users free credit (currently up to $200) and a free usage period, so you can run this at no cost for months.
Rather use the computer you already own? You can instead leave your home computer on and remote into it, with a battery backup so a power outage does not stop it. That is the home-setup version, walked through here: Keep your Butler running while you travel. This guide covers the cloud route, where nothing of yours has to stay running at home.
Here is what the finished setup looks like: a free cloud computer, always on, running your butlers for you.
One thing to know about cloud computers (and the easy fix)
Here is the one honest catch, and the good news is it takes about two minutes to solve.
When Influencer Butler runs on your home computer, it posts from your home internet connection: a normal residential connection, like millions of other households. When it runs on a cloud computer, it posts from a data center instead. Platforms like Facebook can tell the difference, and posting from a data center can look less like a regular person and more like a bot, even when everything you are doing is perfectly legitimate.
The fix is simple and cheap: a residential proxy. Think of it as a little relay that sits on a real home internet connection and passes your posts through it, so to Facebook your cloud computer looks like it is posting from a normal house again. You buy one for a couple of dollars a month, paste it into Influencer Butler once, click Test Connection, and you are done. We walk through the exact steps in Step 15 below.
You do not need to understand any of the technical details. Buy it, paste it, test it, forget it.
One thing to be clear about: today Influencer Butler sends only its Facebook features through the proxy. That means Facebook posting, the Facebook sign-in check, and the Best Seller Butler Facebook scan. Your other butlers, including Instagram, Messenger, and the Amazon butlers, do not use it. On a cloud computer they connect from its data center address, which is the same trade-off described in this post on cloud automation. If those butlers matter most to you, running the app on a computer at home is the better fit.
What you need before you start
- A free AWS account. AWS is Amazon's cloud service. Signing up is free, though they will ask for a card to verify you are a real person (you will not be charged while you stay inside the free limits, and we will show you how to stay there).
- About 30 minutes, once.
- Your Influencer Butler login, the same one you use on your own computer.
- A cheap residential proxy (about $2 to $3 a month). This is the one small ongoing cost that keeps your cloud PC looking like a normal home connection to Facebook (for Facebook only; see the note above). We explained why just above, and we walk through exactly how in Step 15.
That is it. Let's go.
Prefer to skip the setup? There is a one-click shortcut. The free AWS steps below are worth it, and this guide walks you through every one. But if fiddling with the AWS console is not your idea of fun, you can rent a ready-made Windows cloud PC in a few minutes from a host like Hostwinds (Windows plans start around $17 a month), then skip straight to installing Influencer Butler. There is more on that shortcut at the end. Heads up: that is an affiliate link, so we earn a little if you sign up through it, at no extra cost to you. We only mention it because it genuinely saves you the hassle.
Step 1: Create your free AWS account
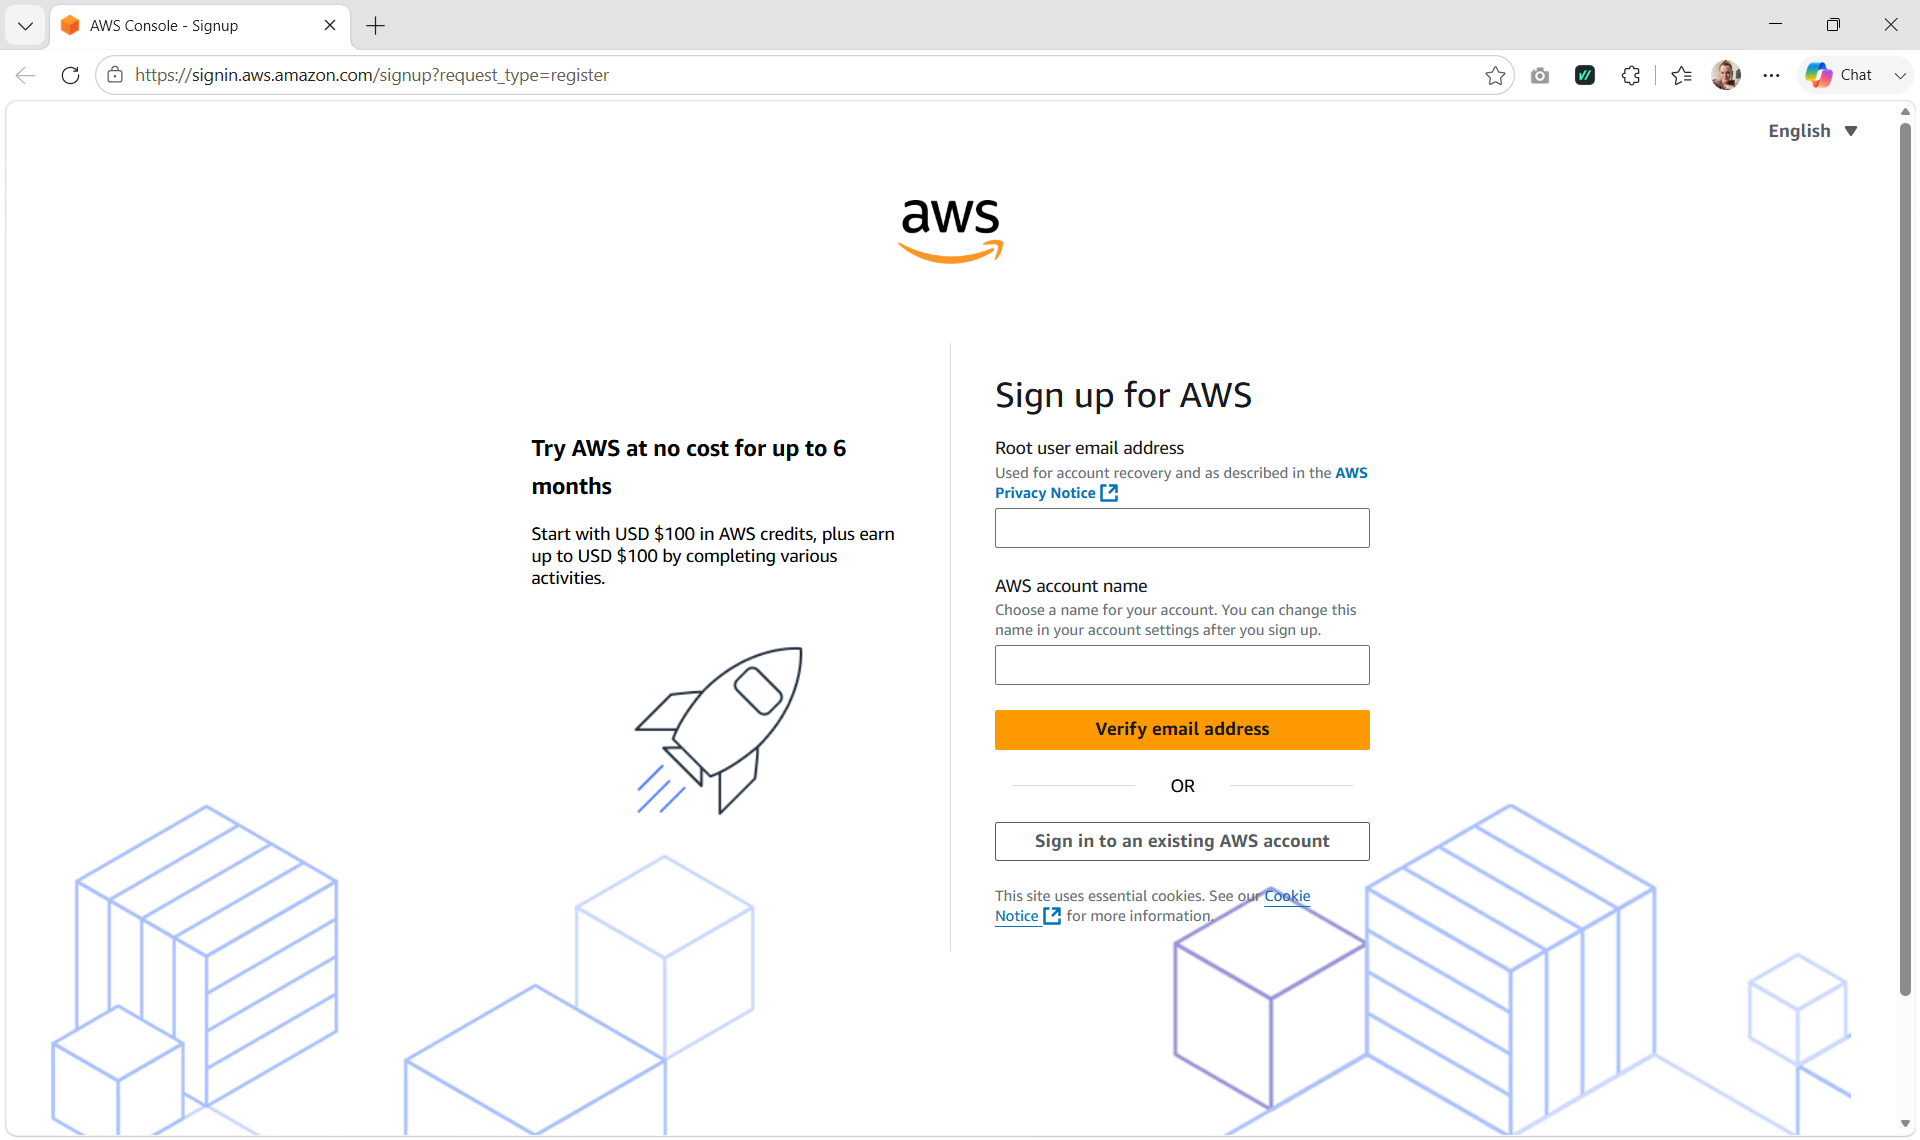
Go to aws.amazon.com and click the big Create a free account button. Enter your email, pick a password, and follow the prompts. You will add a card for verification and pick the Basic (free) support plan when it asks. Take your time; it is just a normal sign-up.
Step 2: Find your free credits
Once you are signed in, you land on the AWS console (a big dashboard with lots of options; do not let it scare you). New accounts get free credits and a free usage window. You can see your free balance under the billing or Free Tier area. This is the pool of free money and hours that will cover your cloud computer. Good to know it is there.
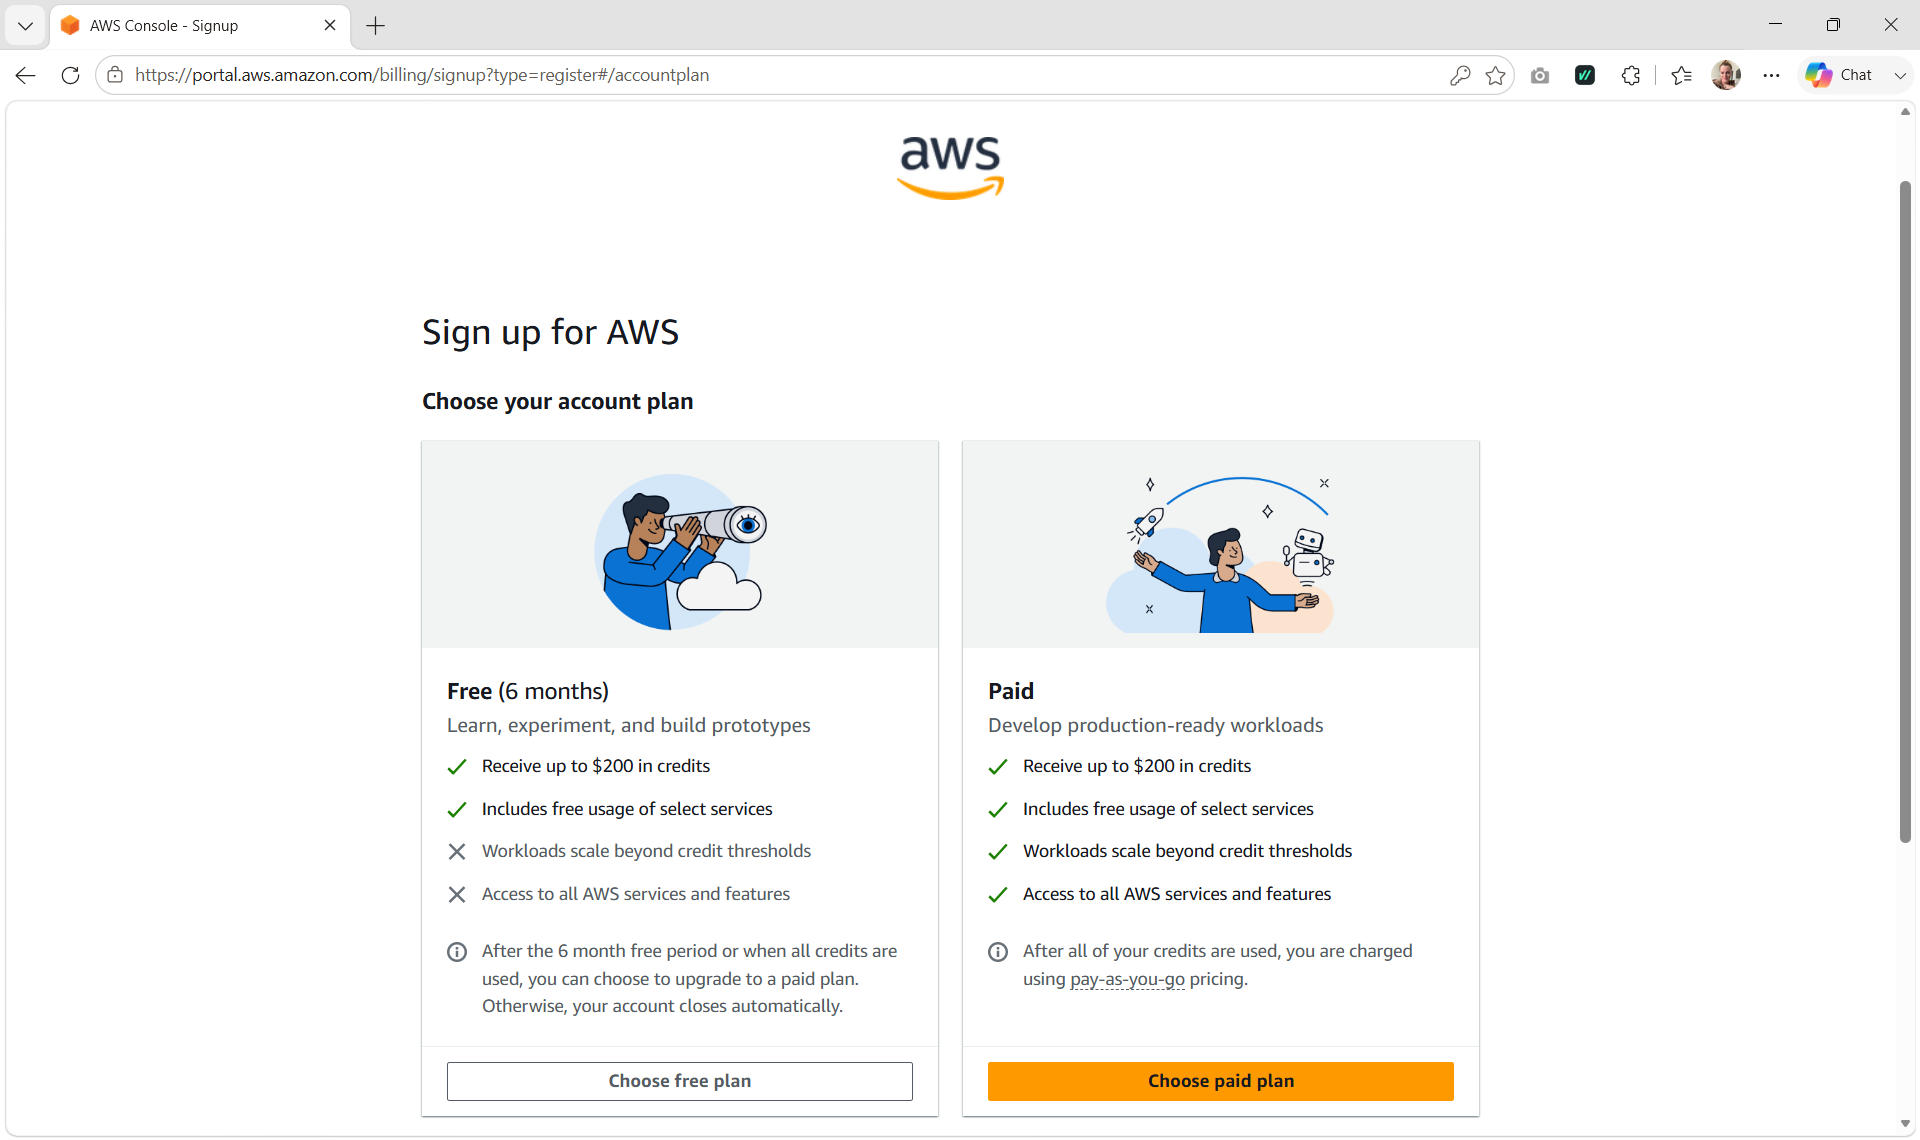
Quick honesty note on the word free: brand-new AWS accounts get free credits (up to $200) that last about six months, and some older accounts get a small computer free for a full year. Either way, this setup is genuinely free to run for months. We will also set up a safety alarm later (see "Keep it free" below) so there are never any surprises.
Step 3: Open EC2 (the cloud-computer service)
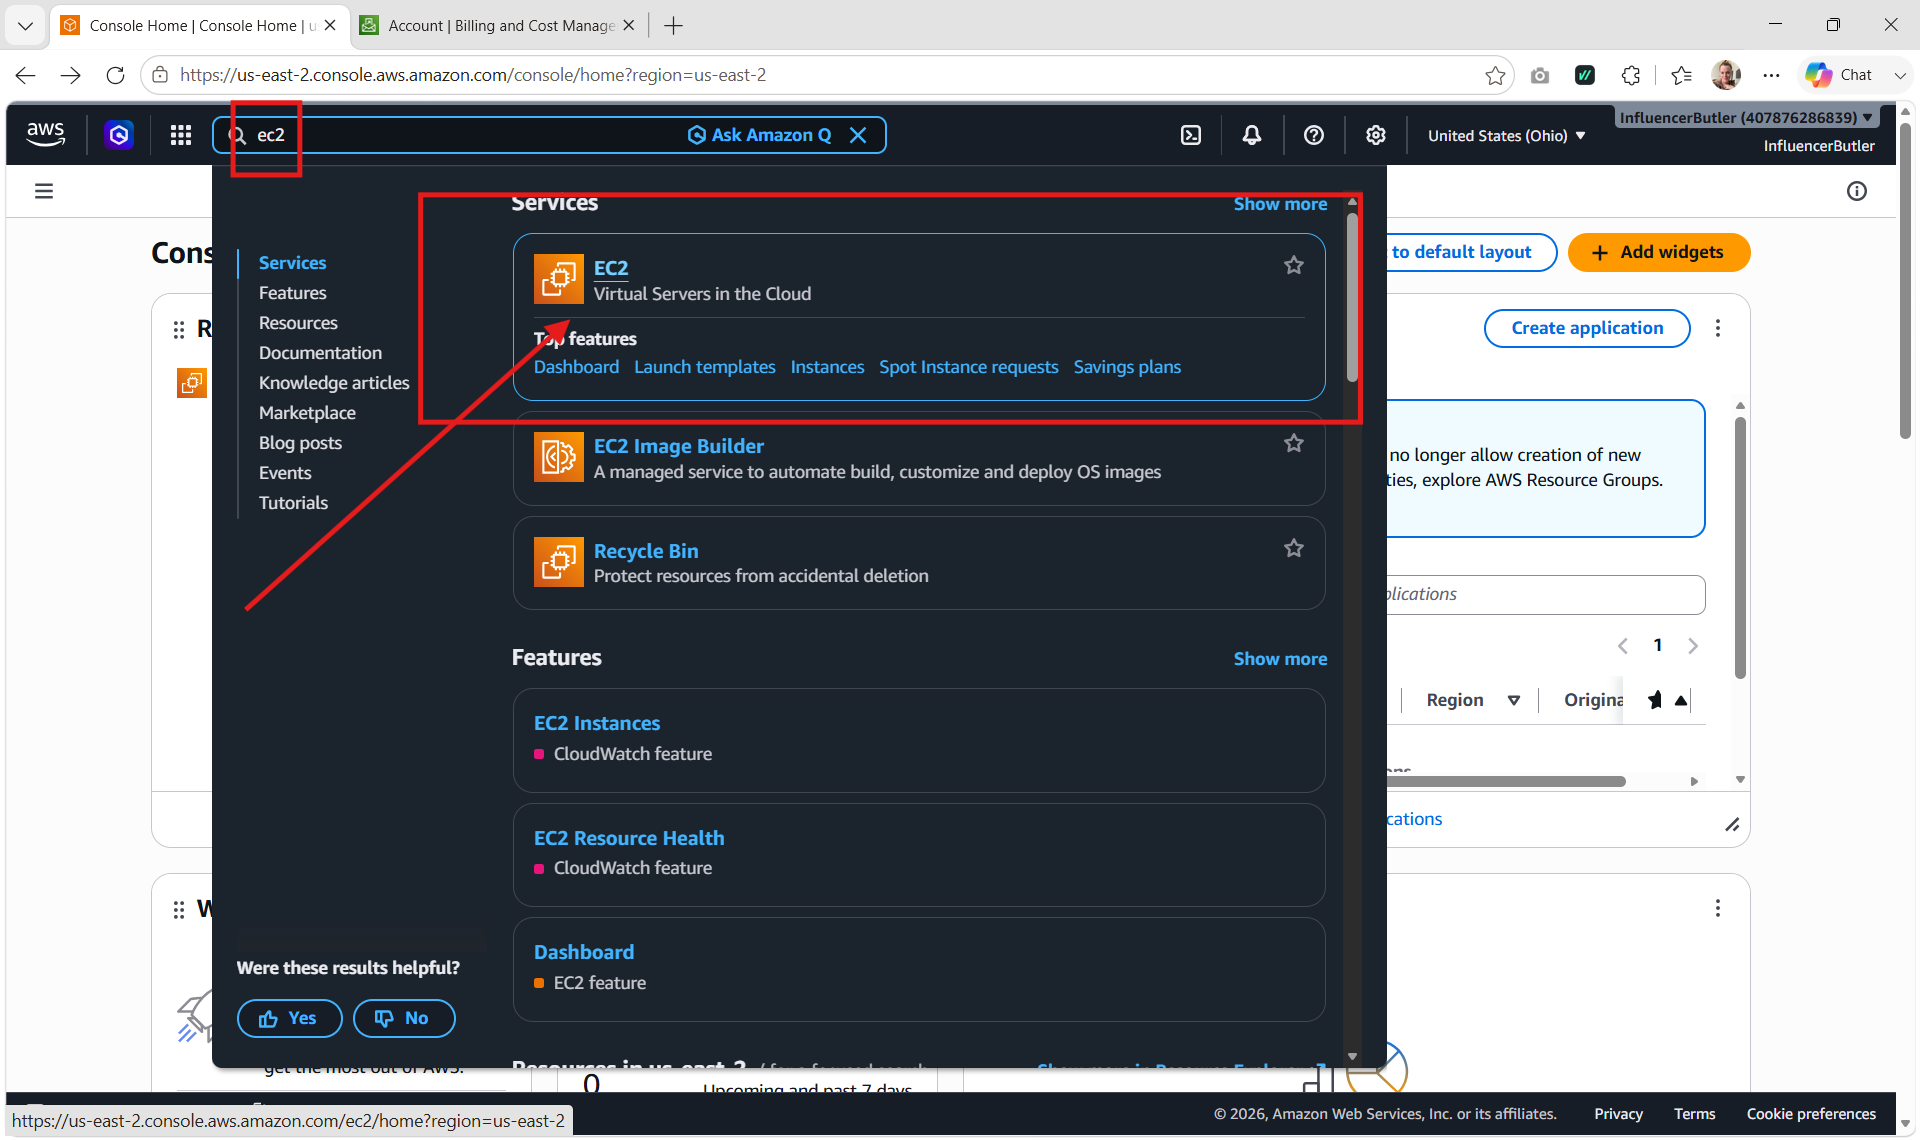
At the top of the AWS console there is a search bar. Type EC2 and click the EC2 result. EC2 is just Amazon's name for "cloud computers." This is where your new computer will live.
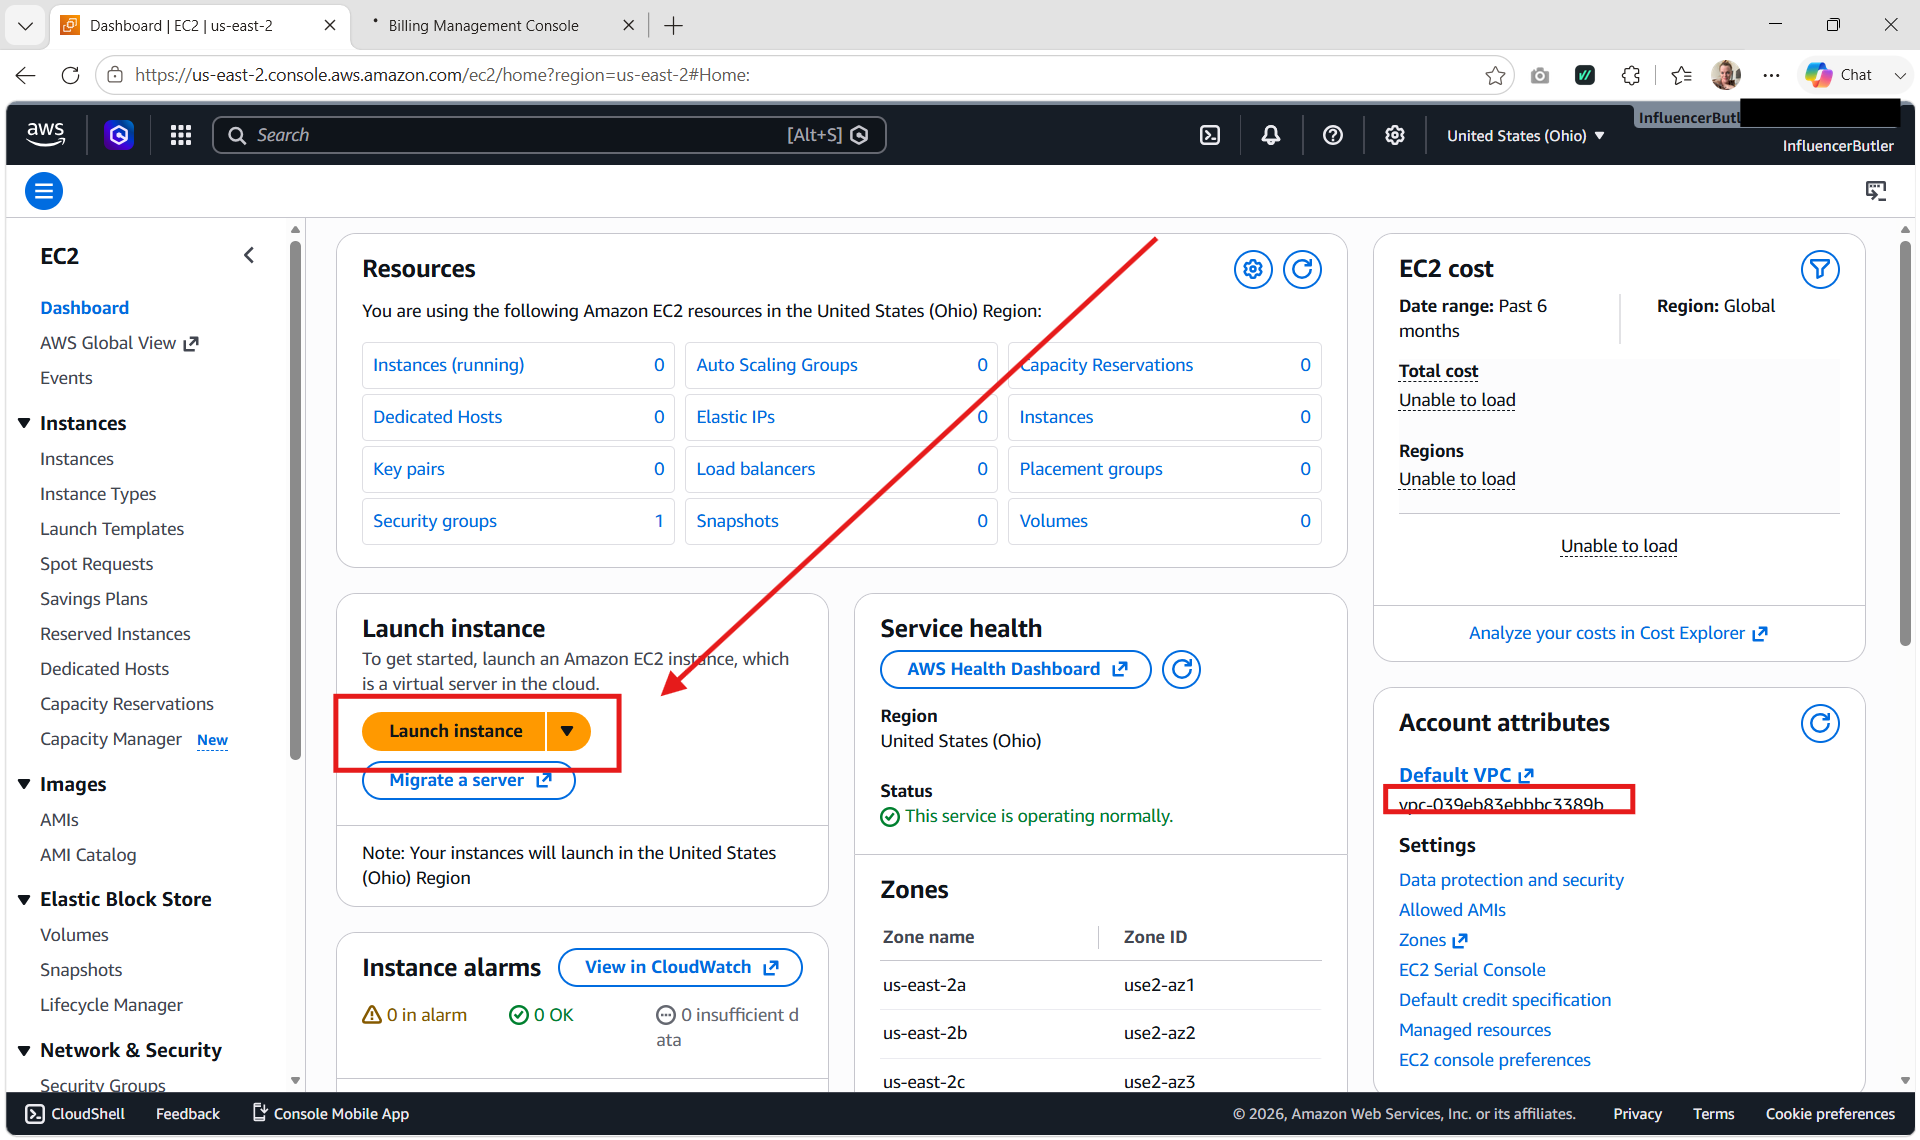
Step 4: Click Launch instance
On the EC2 page, click the orange Launch instance button. "Instance" is just a fancy word for "one cloud computer." You are about to create yours.
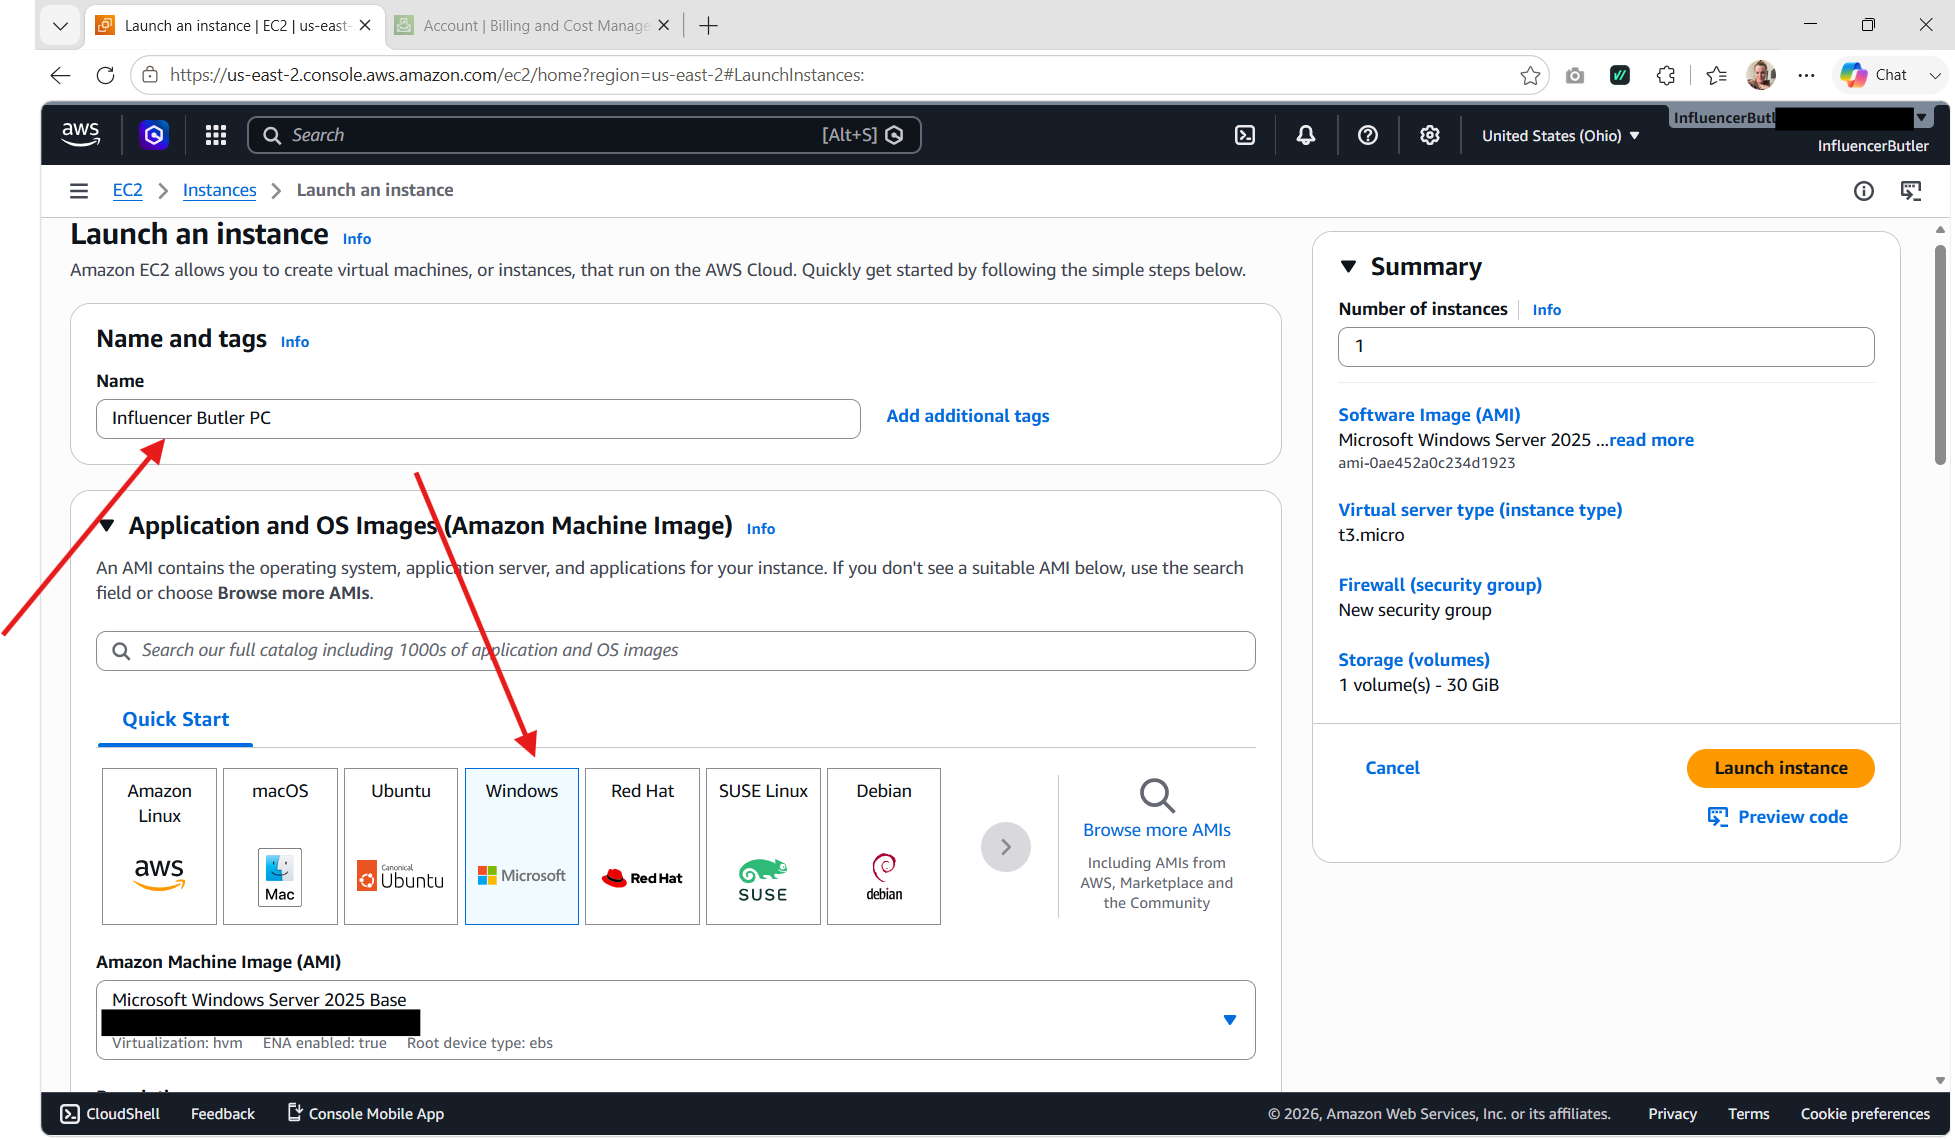
Step 5: Name it and pick Windows
Give it a friendly name like Butler PC. Then, under the list of operating systems, choose a Windows option that is marked Free tier eligible. We pick Windows because Influencer Butler is a Windows app, and Windows gives you a normal desktop you can click around in.
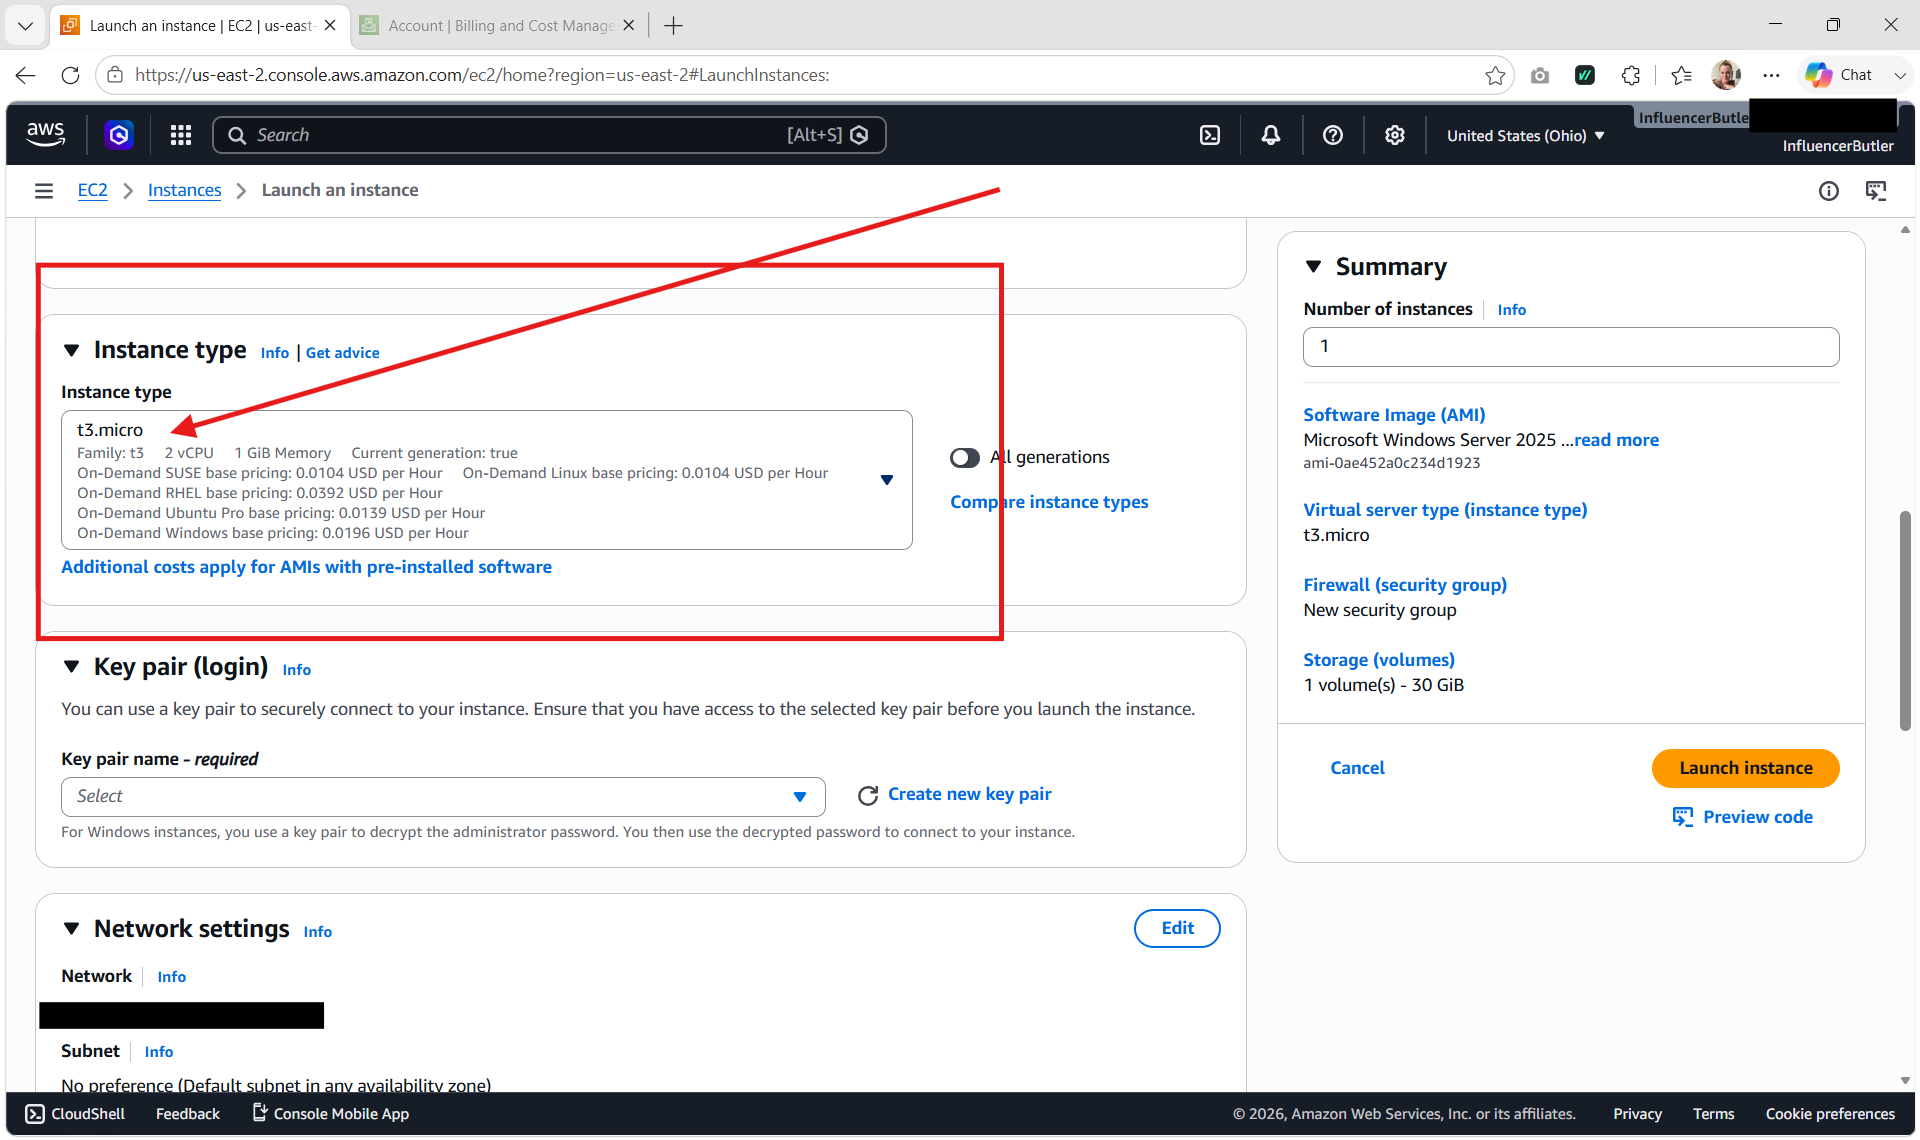
Step 6: Choose a size that can actually run it
This is the one spot that matters most, and we learned it the hard way. AWS offers a tiny size with only 1 GB of memory (t3.micro) that is part of the always-free tier. Do not use it for this. We tried, and it was painfully slow: Windows alone eats most of 1 GB before you even open a browser, so the whole thing crawls and lags.
Pick t3.medium (4 GB of memory) instead. It is the size that actually runs Influencer Butler smoothly, with no lag. The good news: your free credits from Step 2 cover it, so it is still $0 for months. It is not part of the always-free tier, so you will see "Free-tier eligible: false" next to it. That is fine: your credits are paying, not the free hours. After your credits run out, running t3.medium around the clock is roughly $44 a month. If that is more than you want to spend, see the one-click paid shortcut at the end, which can work out cheaper.
If your budget is tighter than your patience, t3.small (2 GB) is the smallest step up that is usable, but it is still snug because Windows is greedy. If you can, go t3.medium. The difference in how it feels is night and day.
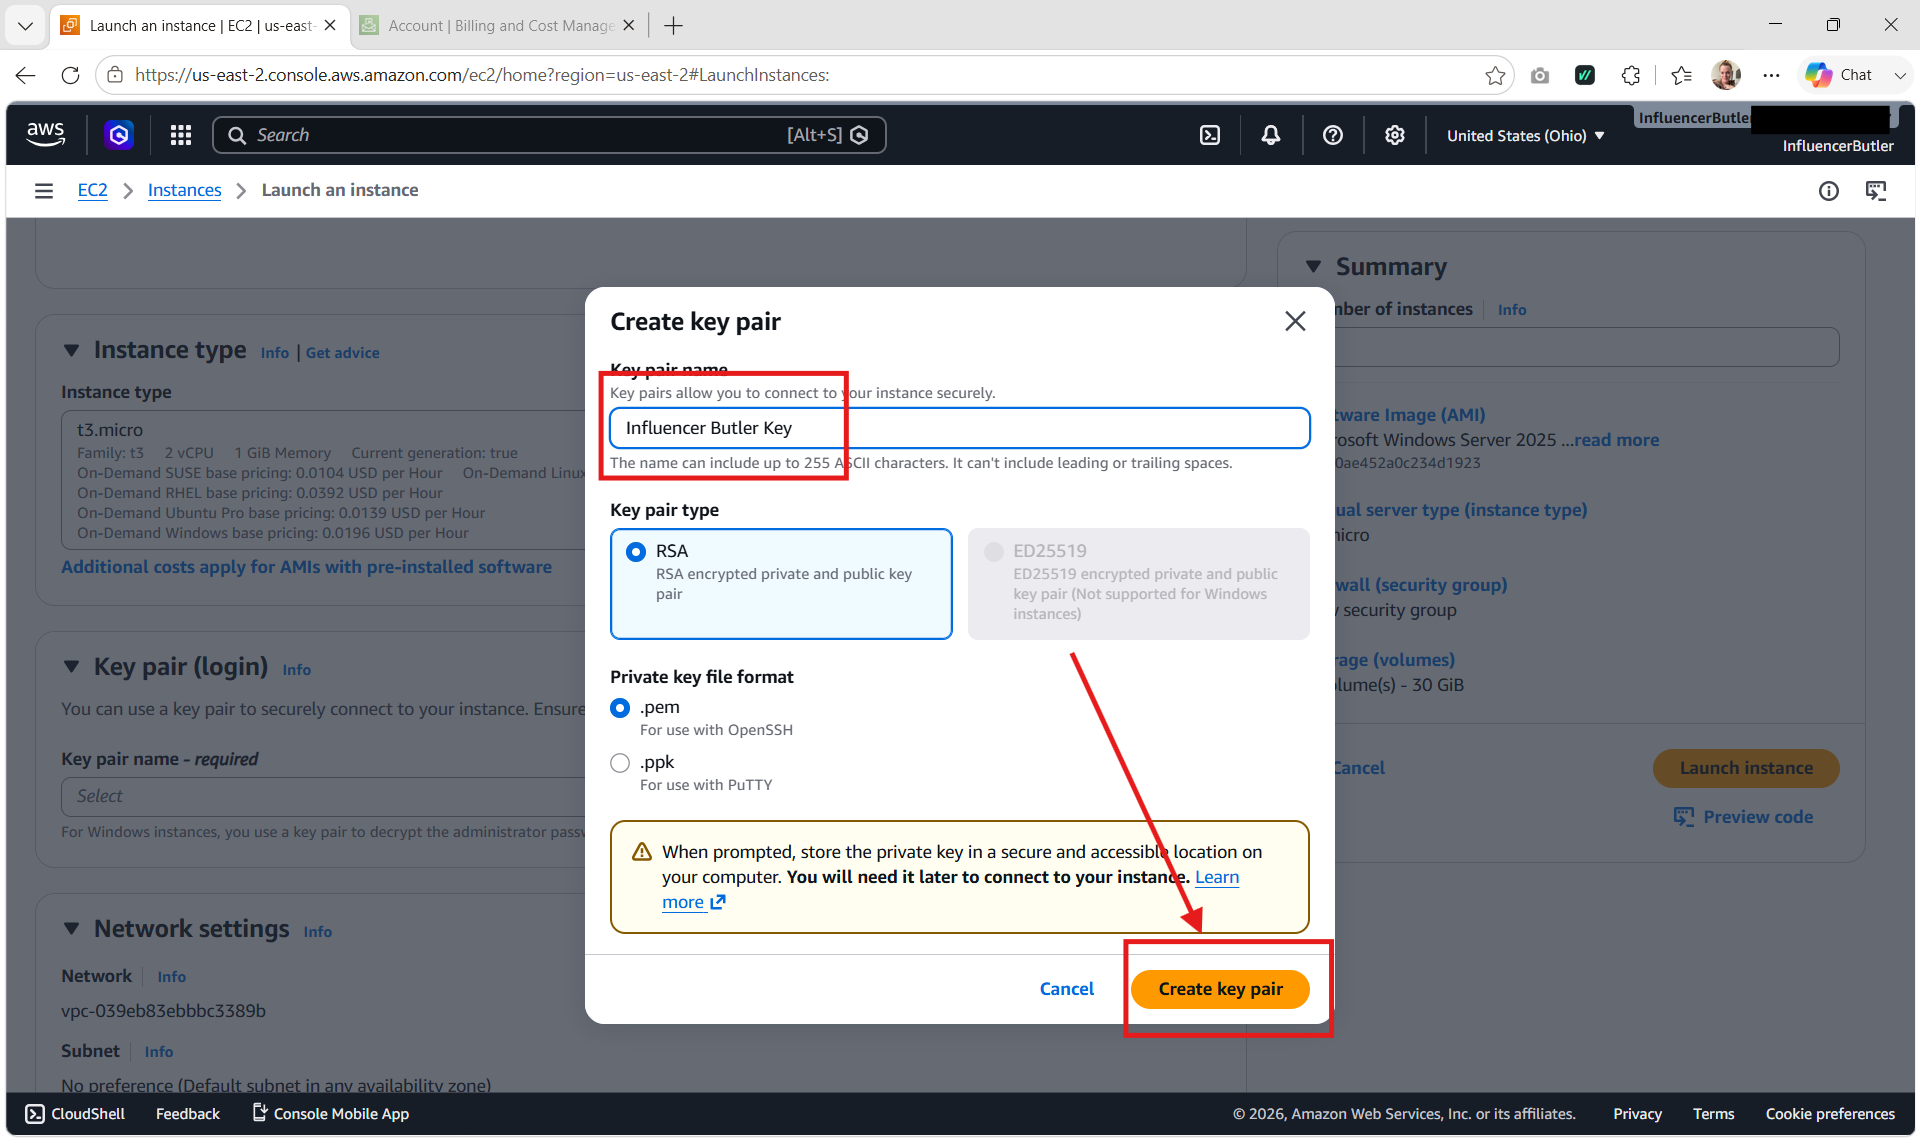
Step 7: Create a key pair
AWS will ask you to create a key pair. Click Create new key pair, give it any name, and download the little file it gives you. Keep that file somewhere safe. You only need it once, to unlock your computer's password in Step 10.
Step 8: Allow Remote Desktop
In the network settings box, make sure the option to Allow RDP (Remote Desktop) is checked. This is what lets you connect to your cloud computer from your own laptop. If it offers to limit it to "My IP," that is a good, safer choice.
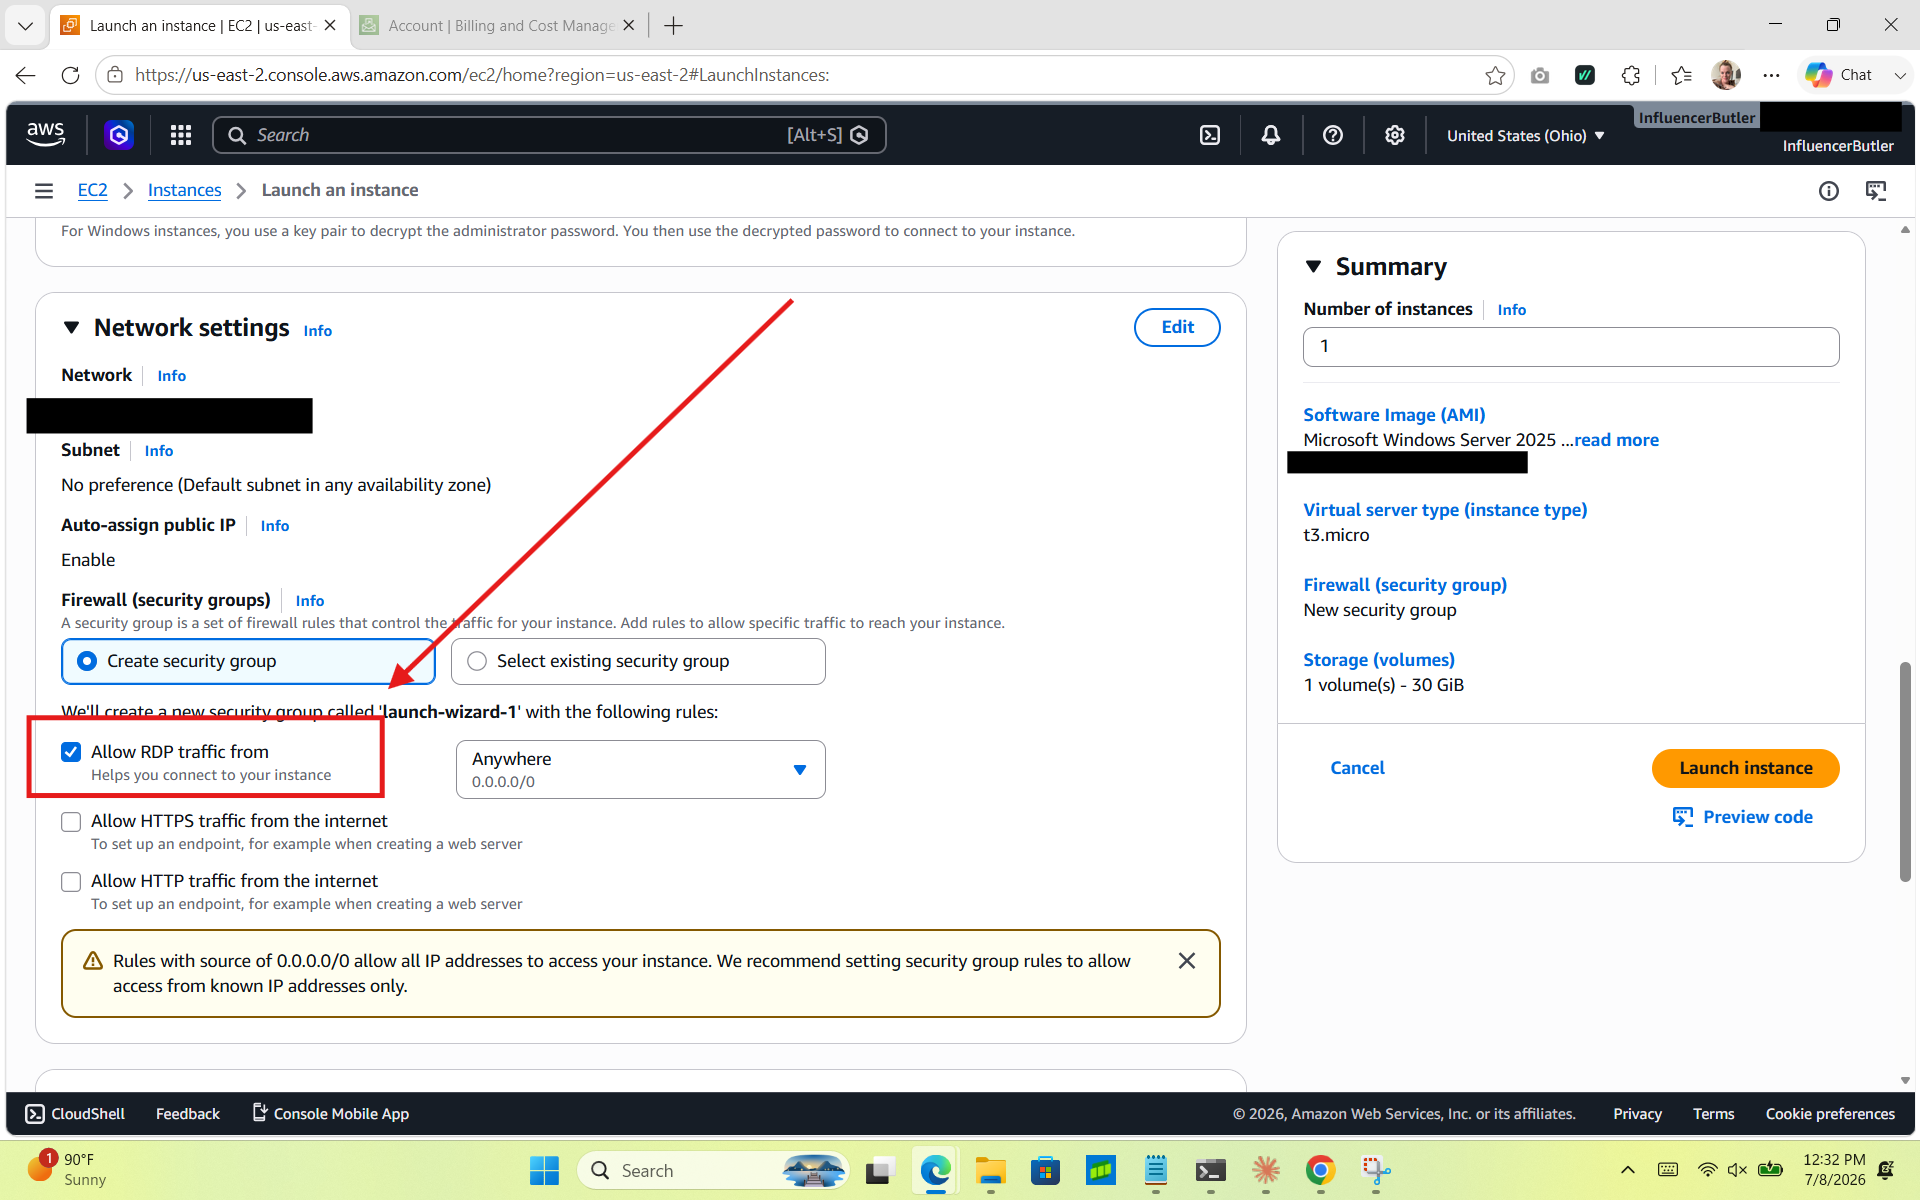
Step 9: Set your storage, then launch
Before you click launch, scroll down to the "Configure storage" section and change the disk size to 60 GB. The default (around 30 GB) is too small: Windows and its own updates fill it up, and you will run out of room the moment you try to install Influencer Butler. Setting it to 60 GB gives you comfortable headroom, and it only adds a couple of dollars a month, covered by your free credits.
Then click the Launch instance button on the right. You will see a friendly green Success screen. That is it: your cloud computer now exists and is booting up. Give it a couple of minutes to wake up.
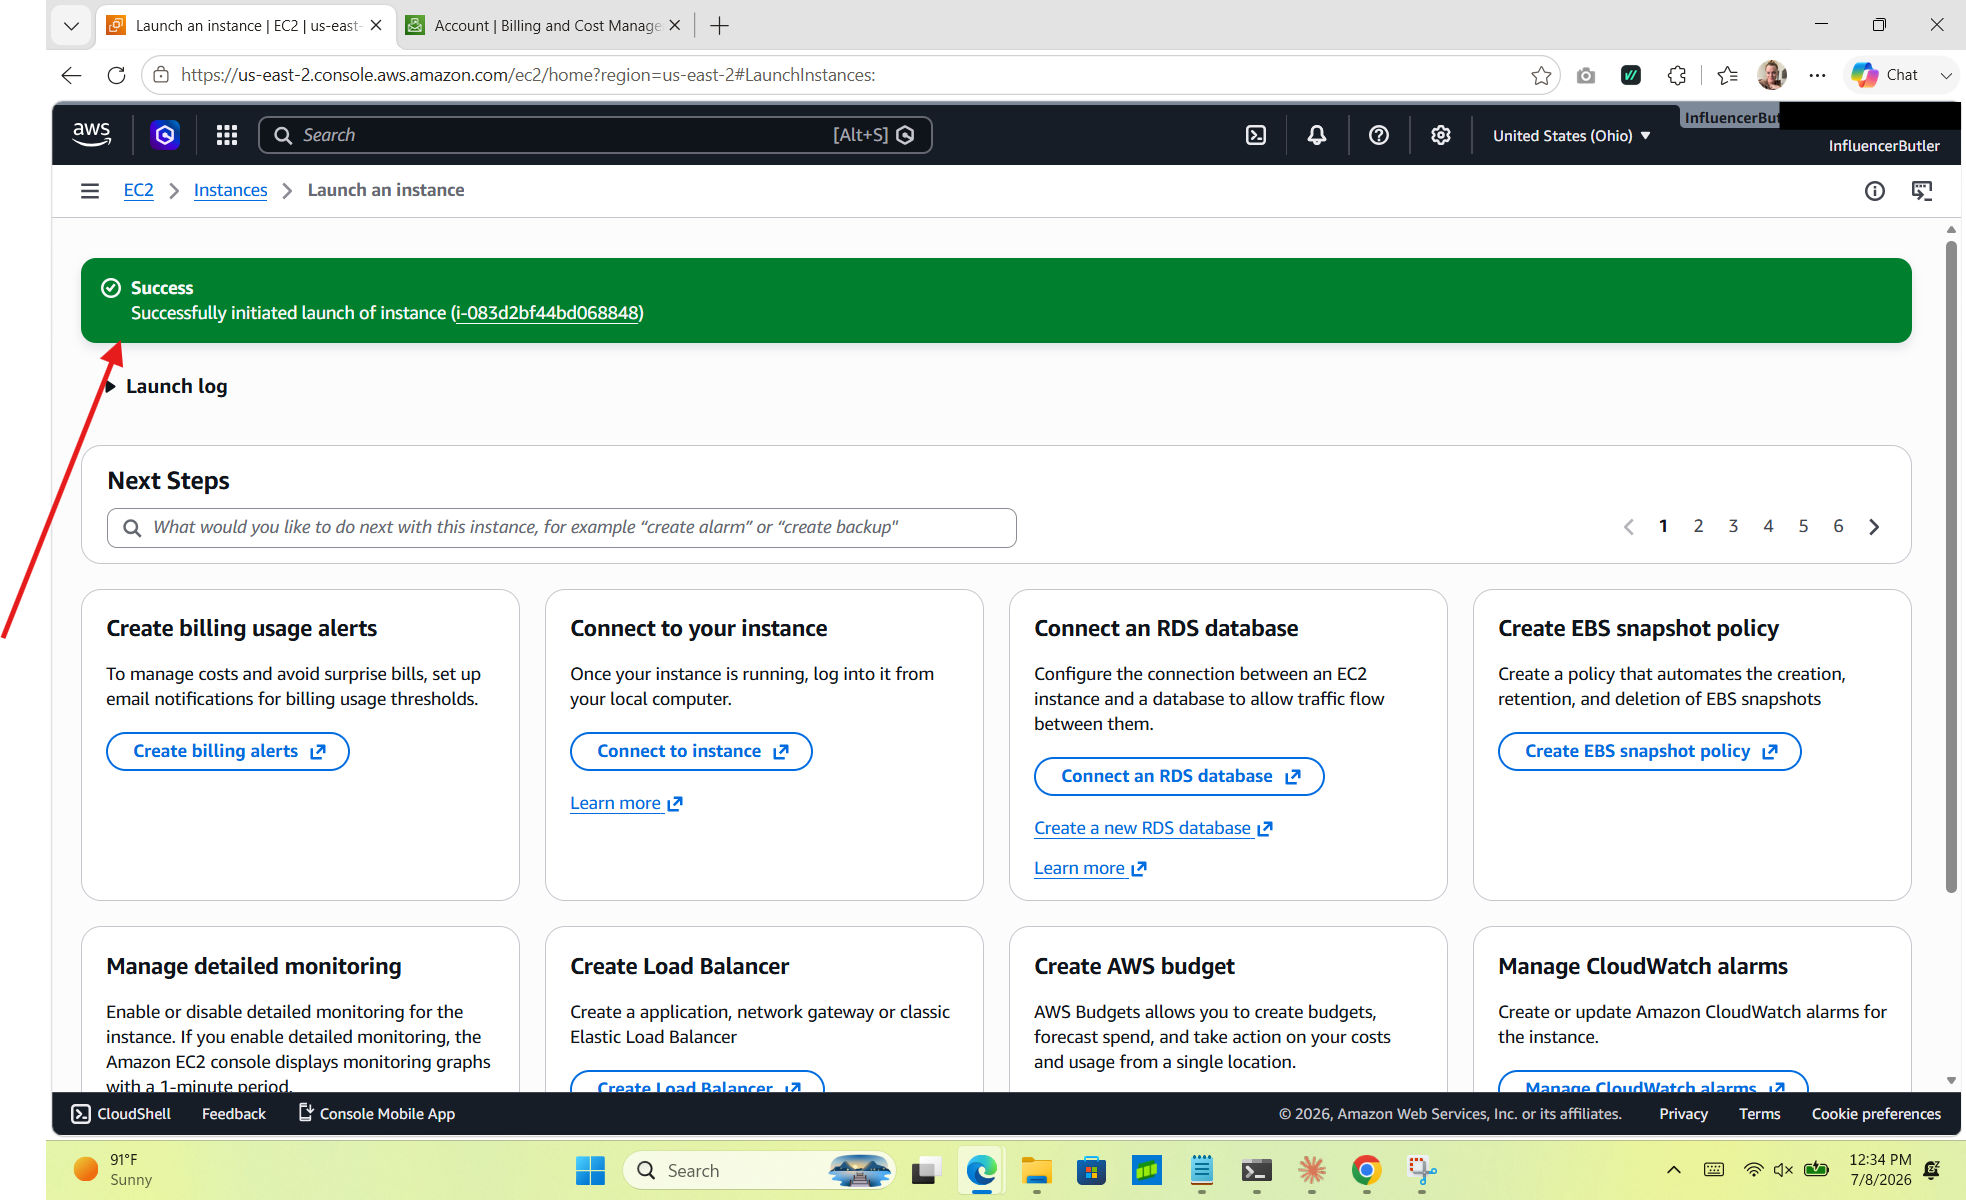
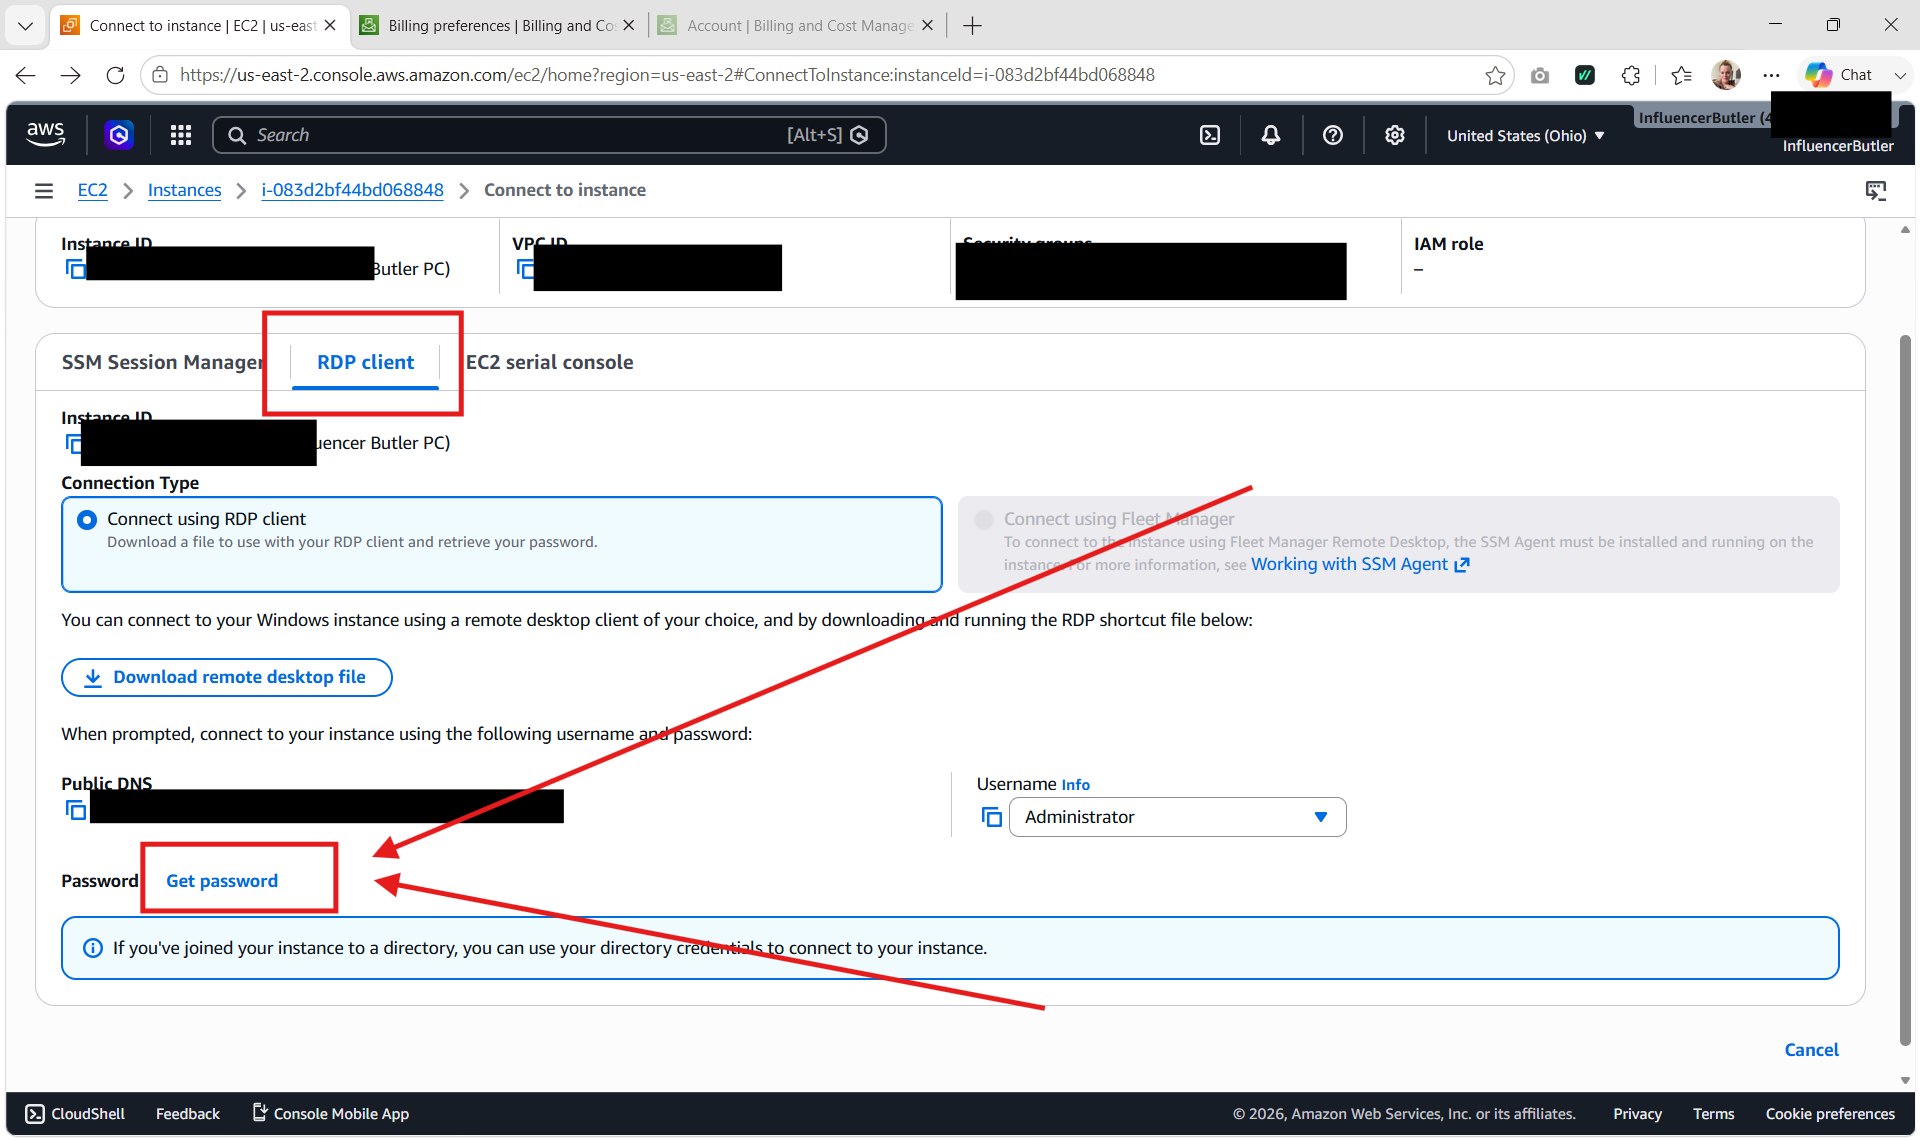
Step 10: Get your password
Go back to your list of instances and click your new Butler PC. Click Connect, then the RDP client tab, then Get password. Upload the key file you saved in Step 7, and AWS will show you the password for your cloud computer. Copy it somewhere handy. Also copy the Public DNS or IP address shown on that screen; that is your computer's "address."
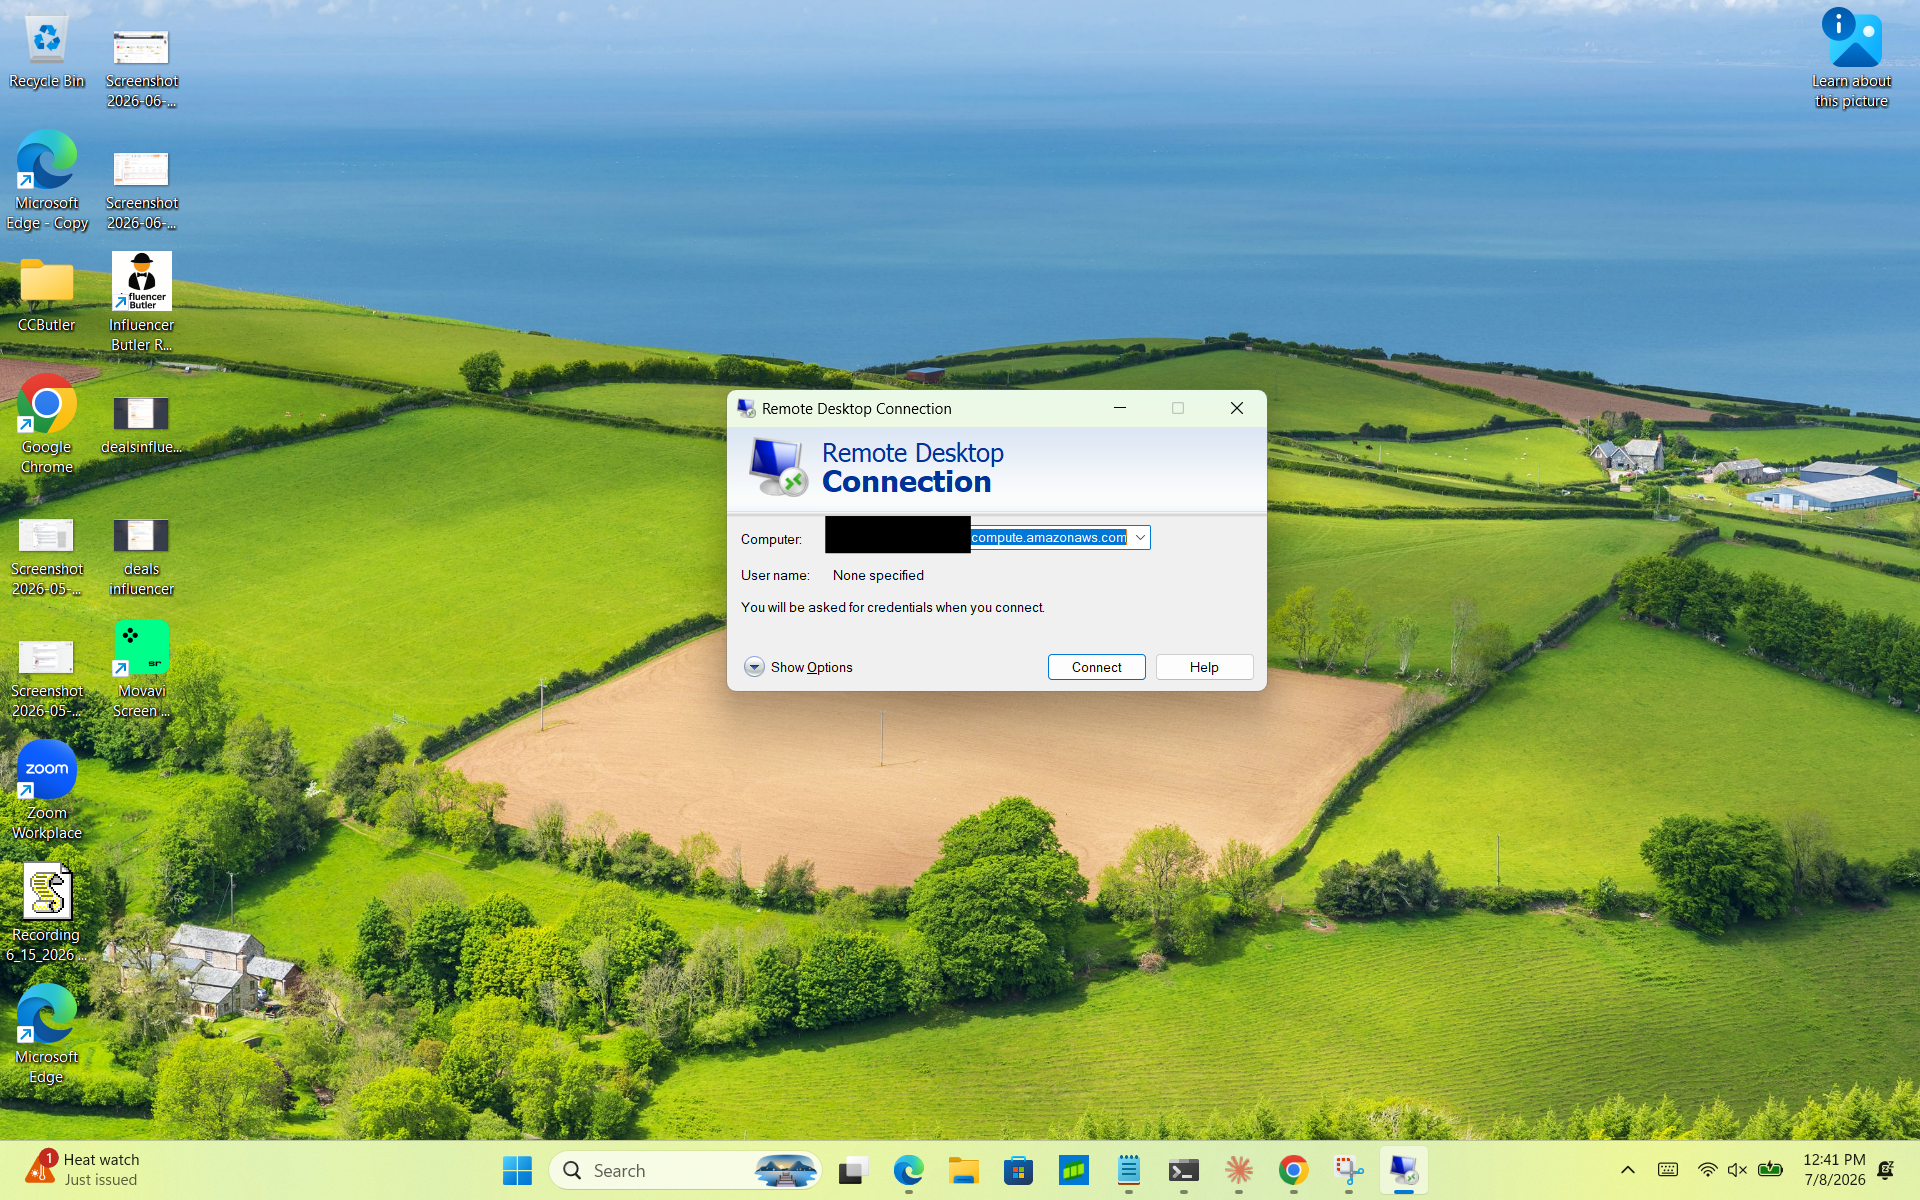
Step 11: Open Remote Desktop and connect
Now, on your own laptop, open the Remote Desktop app.
- On Windows: it is already installed. Search your Start menu for Remote Desktop Connection.
- On a Mac: get the free Windows App (formerly Microsoft Remote Desktop) from the App Store.
Paste in the address from Step 10, then enter the username Administrator and the password you copied. Click connect.
Step 12: You are in
A Windows desktop appears in a window on your screen. That is your cloud computer. You are now controlling it as if you were sitting right in front of it. Feels like magic the first time.
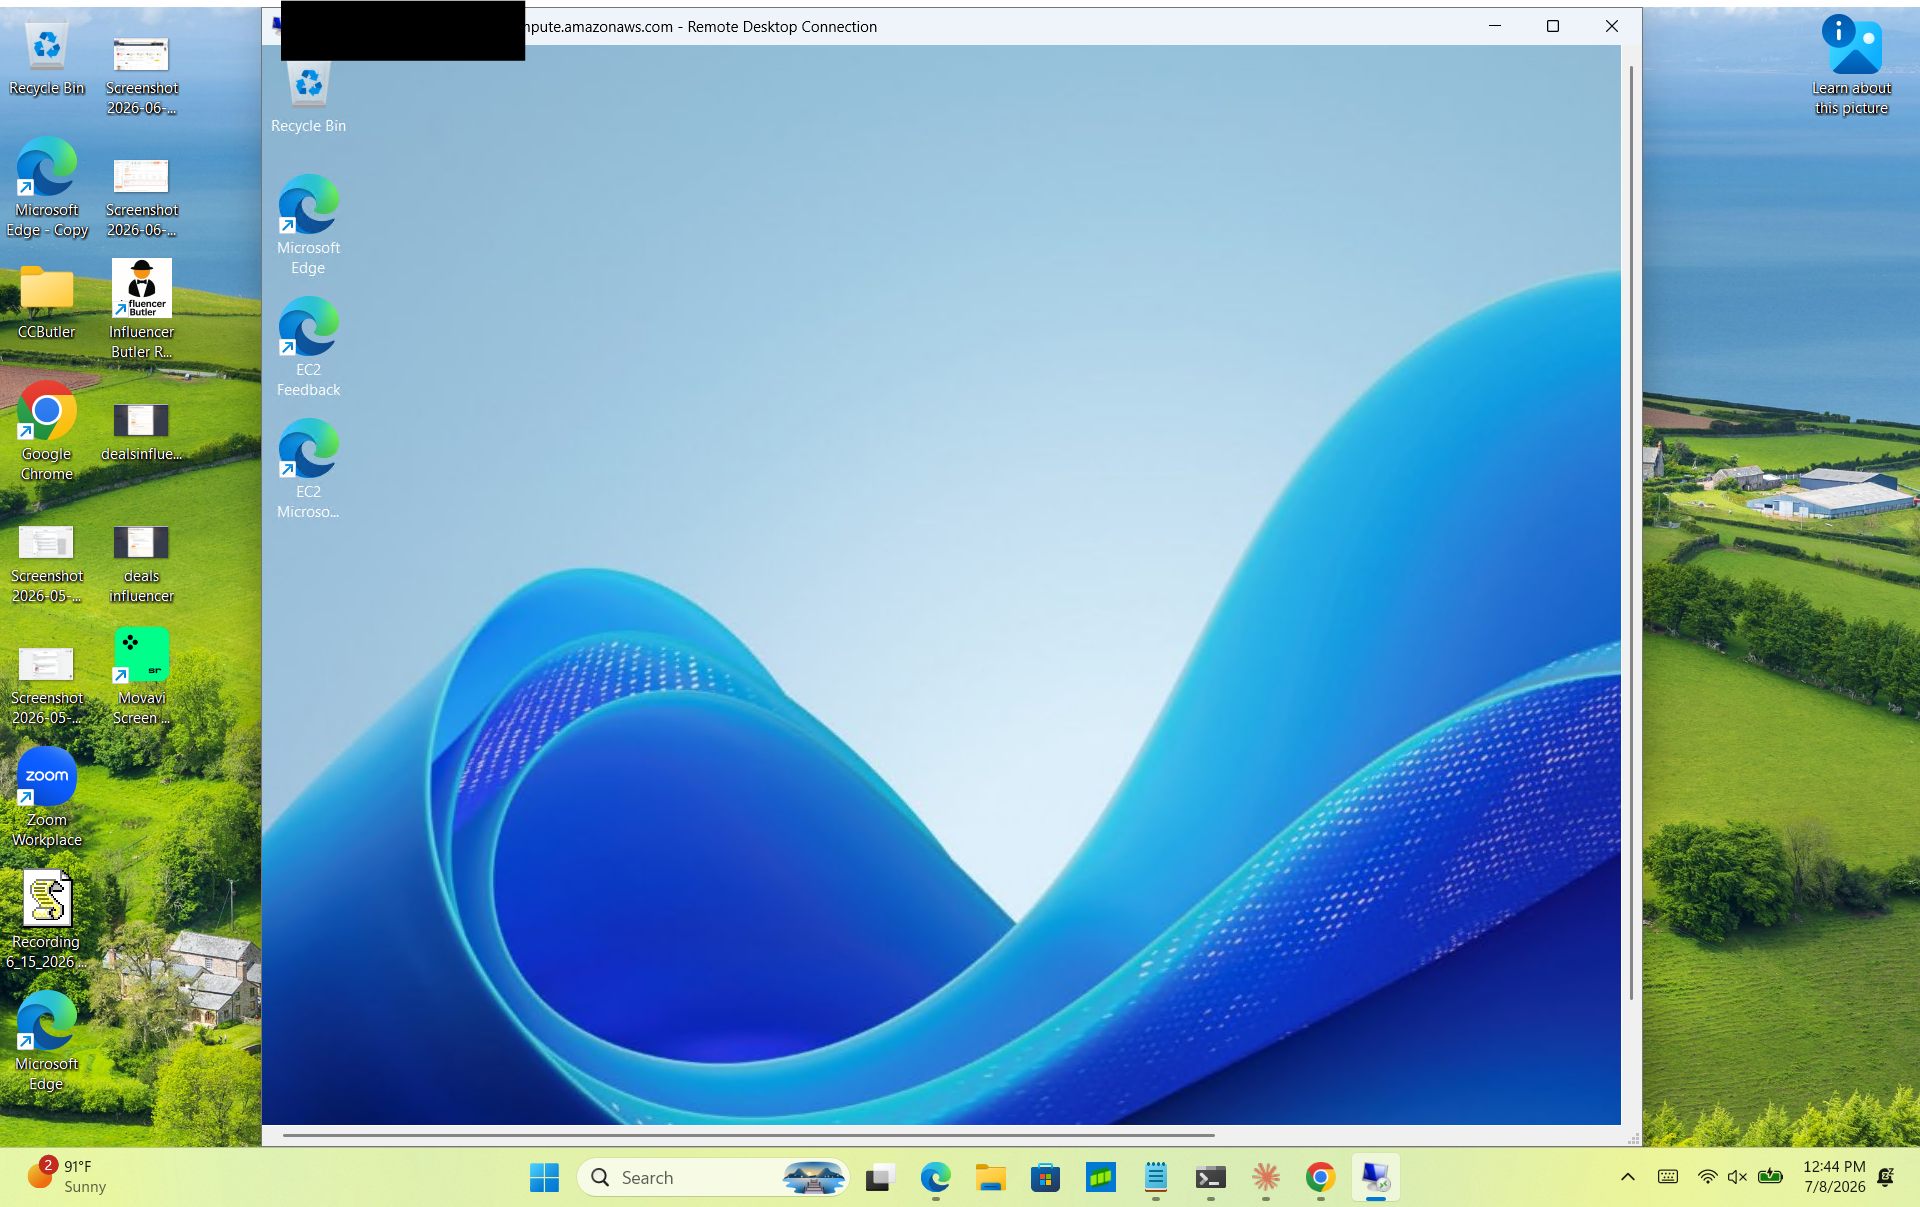
Step 13: Install Influencer Butler on the cloud PC
On the cloud desktop, open the web browser and go to your Influencer Butler download page, exactly like you would on any new computer. Download the installer and run it. (If Windows shows a blue "protected your PC" box, click More info, then Run anyway; that just means the file is new, not unsafe.)
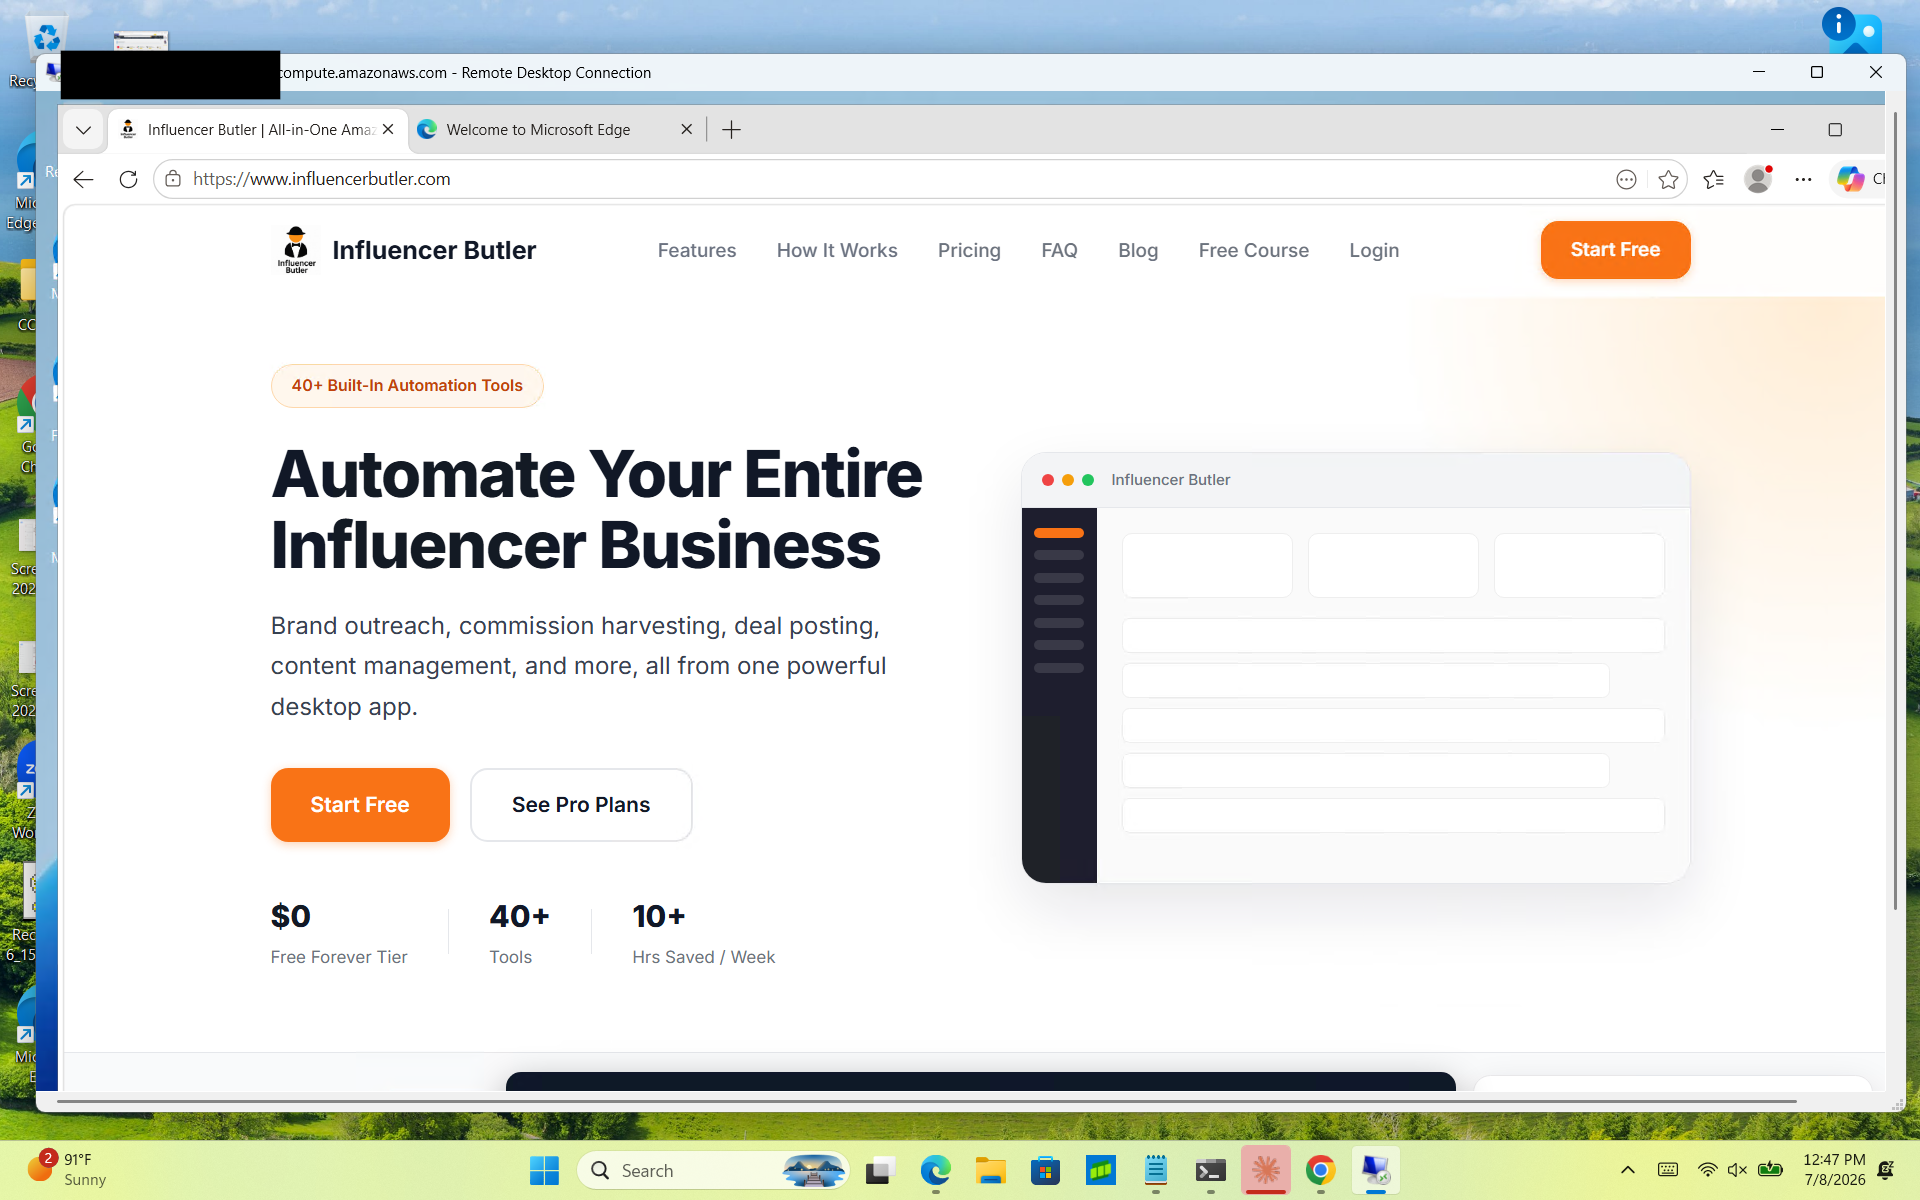
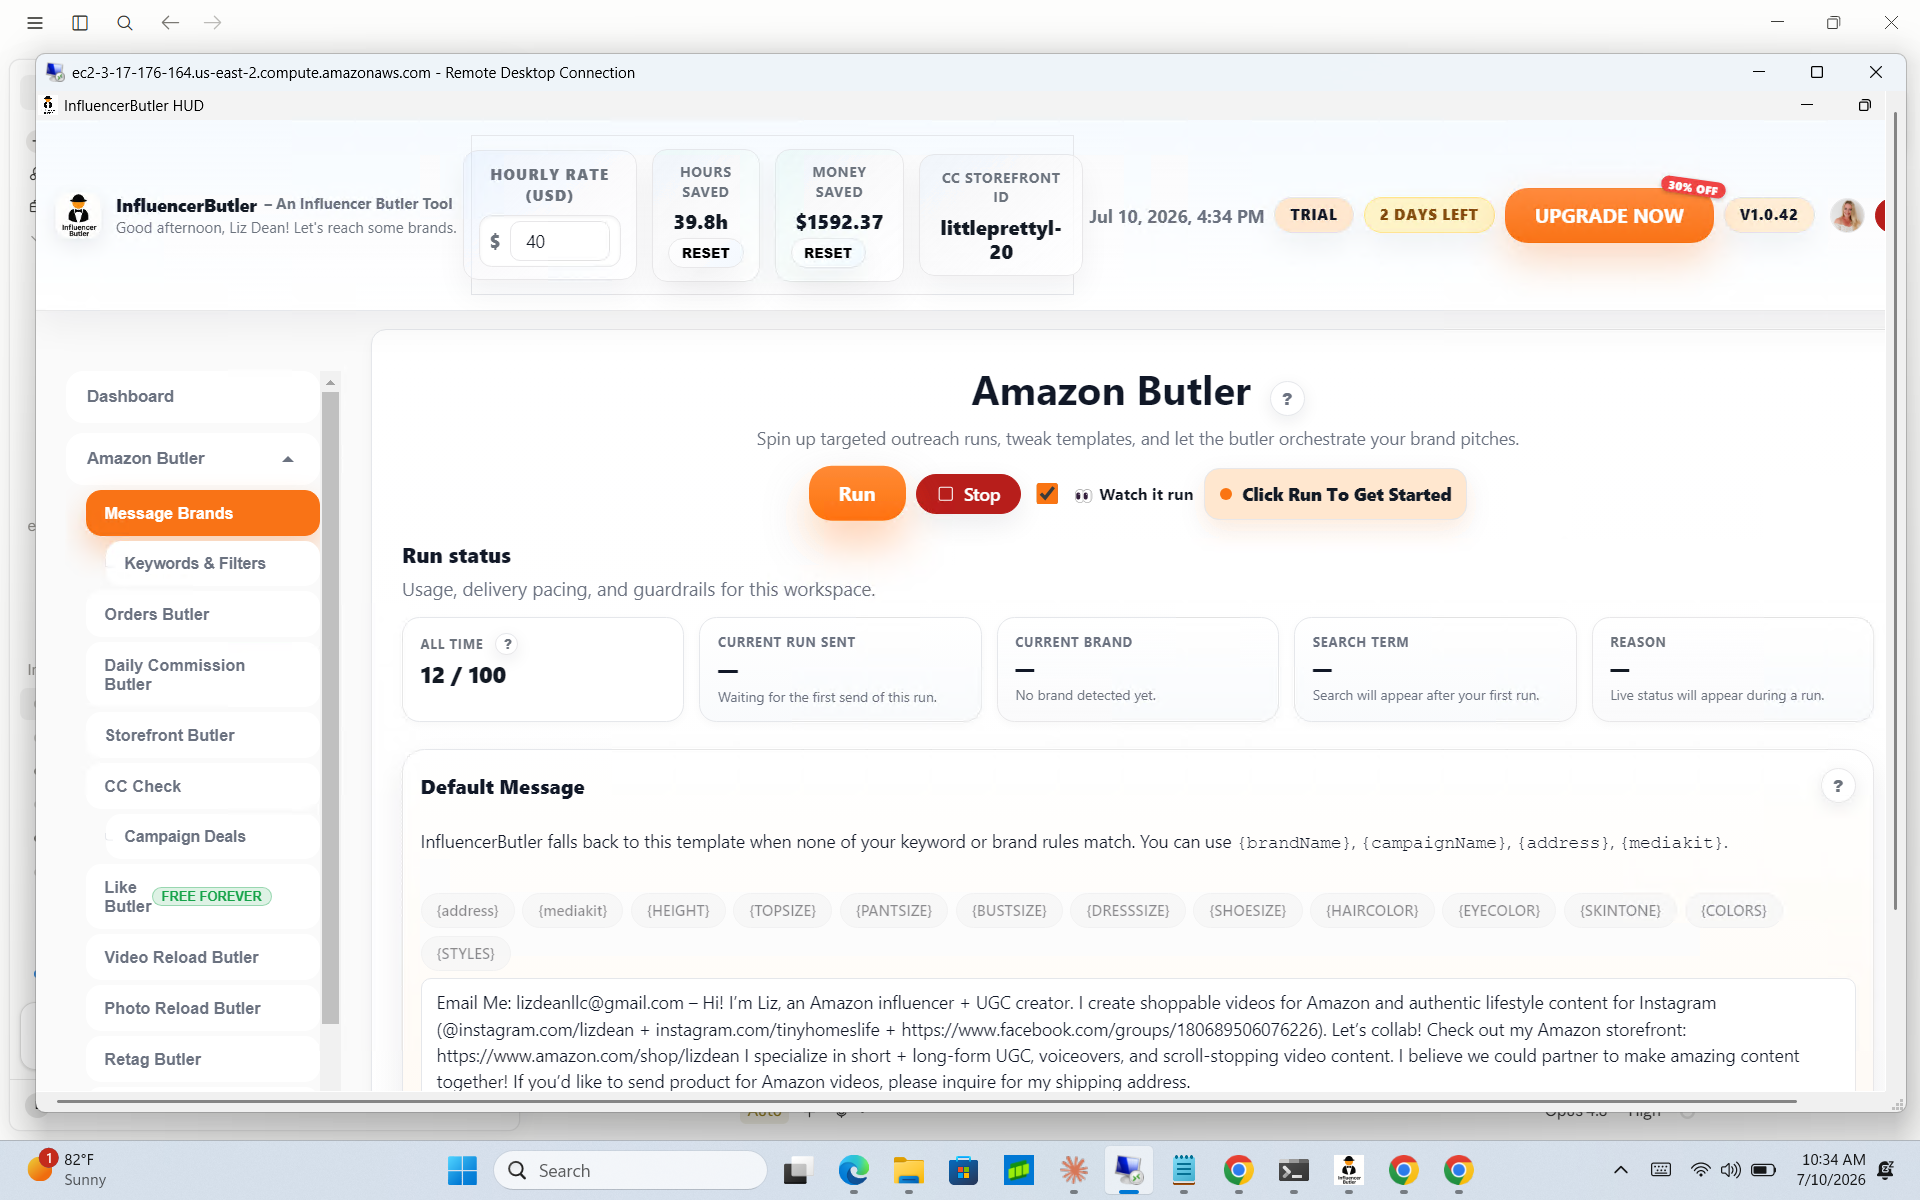
Step 14: Log in and start your butlers
Open Influencer Butler on the cloud computer and log in with your normal account. Set up and start whichever butlers you want running: your Daily Commission Butler, your Instagram butlers, whatever you use. This is the same app you already know, just running on a computer that never sleeps.
Step 15: Turn on your home-style connection (residential proxy)
This is the step that makes your cloud PC look like a normal home computer to Facebook. It takes about two minutes. It applies to the app's Facebook features only (see the note near the top); Instagram, Messenger, and the Amazon butlers do not use it.
First, buy a residential proxy. You want a static residential proxy (sometimes called an ISP proxy), which gives you one steady home-style address that does not keep changing. Steady is exactly what you want here: one account, posting from one consistent home-looking address, is the most natural-looking setup. (Skip the "rotating" residential proxies for this. A constantly changing address looks stranger, not safer, for an account that stays logged in.) Two reliable, budget-friendly options:
- Decodo (our top pick): static residential addresses from around $1.60 a month, reliable, with a simple dashboard.
- IPRoyal (also great): static residential addresses from around $1.80 a month.
Either one is plenty. Posting uses almost no data, so the smallest plan is fine.
Then, copy your proxy details. After you buy, the provider's dashboard shows you a few things: a host (an address like gate.decodo.com), a port (a number like 7000), and usually a username and password. Copy them somewhere handy. (Some providers let you skip the username and password by "whitelisting" your cloud PC's address instead. Either way works.)
Finally, paste them into Influencer Butler. On the cloud PC, open Influencer Butler, go to Settings, and find the Residential Proxy card. Paste in your host, port, and (if you have them) username and password, then click Test Connection. When it turns green and shows a message like "Connected. Egress IP ...", you are set: your Facebook posts now leave from a home-style connection. That is the whole job.
Heads up: the Decodo and IPRoyal links above are affiliate links, so we earn a small commission if you sign up through them, at no extra cost to you. We point you to them because they are the cheapest reliable options we found for this exact job.
One honest caveat: neither provider above, or any residential proxy provider, is vetted by our team, and we cannot guarantee what you get on their back end at any given time. Before you sign up with any provider, it is worth sending their support team a quick message and asking:
- Is the IP I would get exclusive to me, or is it ever resold or shared with other customers?
- How big is the pool this IP comes from, and how many customers draw from it?
- Is it a sticky (static) address, or does it rotate?
- What happens if this IP ever gets flagged, do I get a replacement?
A clear, specific, in-writing answer is a good sign. A vague one, or a push toward an "unlimited" plan instead of a straight answer, is worth noticing. We walk through the full version of this check, including how to look up an IP's reputation yourself, in this post on vetting a proxy provider. Whichever provider you choose, use it at your own judgment.
Step 16: The magic part, leave it running
Here is the whole point. When you are done, do not shut the cloud computer down. Just close the Remote Desktop window (or close your laptop entirely). The cloud computer stays on and keeps running your butlers 24/7.
- Close Remote Desktop = you leave, but the cloud PC keeps working. This is what you want almost every time.
- Shut down (from inside the Windows Start menu) = the cloud PC turns off and stops working. Only do this if you want to pause it.
Now you can travel, close your laptop, lose your wifi, and your butlers never miss a beat.
Keep it free: set a safety alarm
To make sure "free" stays free, set a simple billing alarm so AWS emails you if you ever get close to a charge. In the AWS search bar, go to Budgets, create a small budget (say $1), and add your email. Now you will always get a heads-up long before any real cost.
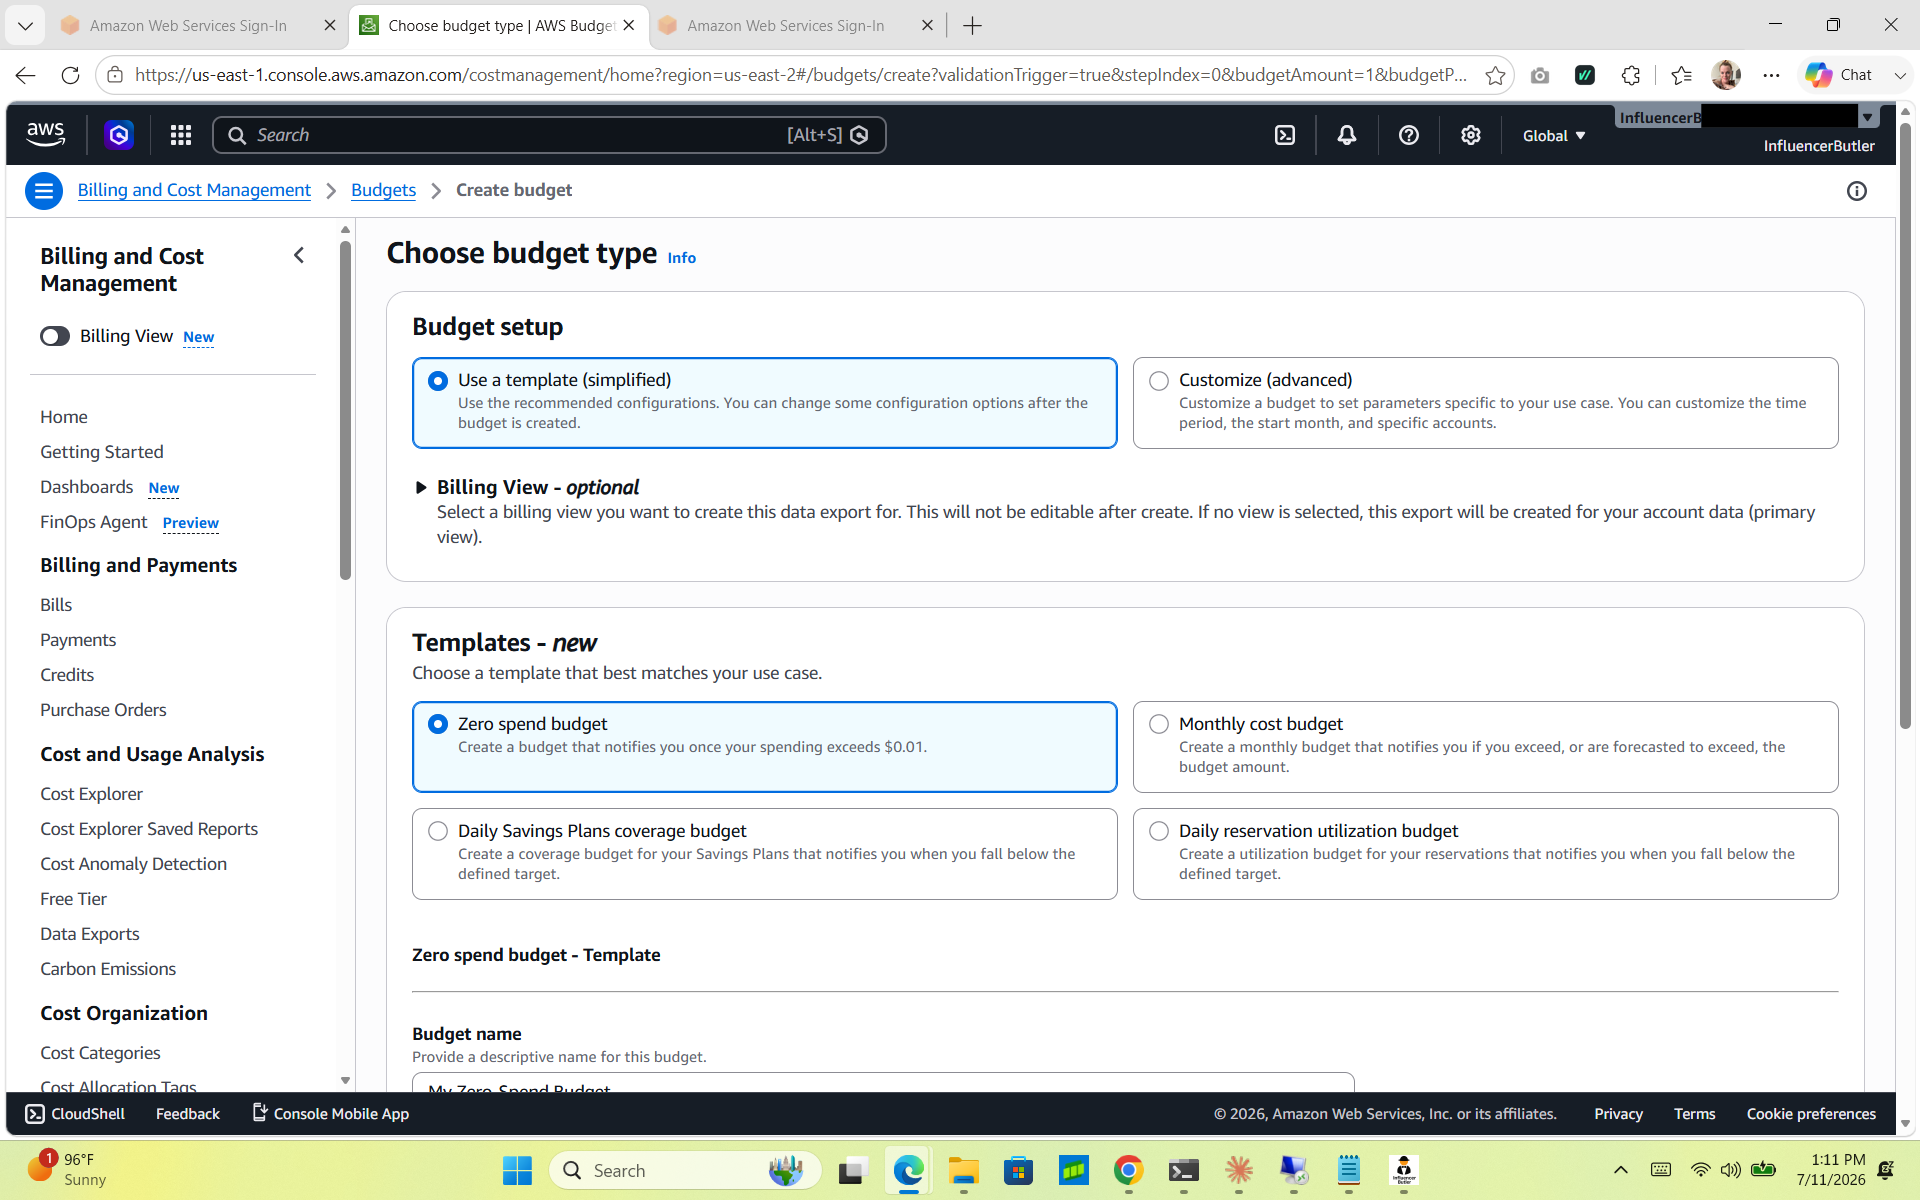
A couple more habits to stay free and safe:
- Check your Free Tier balance every few weeks (that page from Step 2).
- When your free credits eventually run out, running t3.medium around the clock is roughly $44 a month. If the hours it saves you are worth that, keep it. If not, you can stop the instance when you are not using it, drop to a smaller size, or terminate it to end all costs.
The shortcut: a ready-made cloud PC, no AWS console
Everything above is the free way, and for most people it is the right way. But if you took one look at 15 steps and thought "no thanks," there is a paid shortcut that skips almost all of it.
A host like Hostwinds gives you a ready-made Windows cloud PC (a Windows VPS) starting around $17 a month, with no AWS console, no key pairs, and no instance sizes to wrestle with. One tip: pick a plan with at least 2 GB of RAM (same reason we skipped the tiny AWS size, or it will feel slow). They set it up and send you an address and password, you open Remote Desktop exactly like in Step 11, and you go straight to installing Influencer Butler. It is not free the way the AWS route is while your credits last, but it is simpler, and once those credits run out it actually works out cheaper than running the AWS machine around the clock (~$17 versus ~$44 a month).
Heads up: the Hostwinds links here are affiliate links, so we earn a small commission if you sign up through them, at no extra cost to you. We would point you there either way, because it genuinely removes the setup work. The free AWS path above stays free and is always your other option.
Quick FAQ
Is it really free? Yes, for months. New AWS accounts get free credits (up to $200) plus a free usage window, which comfortably covers your cloud computer while you get going. After the credits run out it is a small monthly cost you control (around $44 for the recommended size, less if you stop it when you are not using it), and the billing alarm (see "Keep it free" above) warns you long before anything sneaks up.
I use a Mac. Can I still do this? Absolutely. You connect from your Mac using the free Windows App from the App Store, and the cloud computer itself runs Windows so Influencer Butler works perfectly.
Will it keep running if my laptop dies or loses wifi? Yes. That is the whole benefit. Your laptop is just a remote control. The cloud computer keeps working on its own.
Is my login safe on it? It is your private computer that only you can reach with your password and key file. Keep the password and key file to yourself, limit Remote Desktop to "My IP" in Step 8, and you are in good shape.
Will Facebook know it is a cloud computer? Step 15 is there to prevent that. A cloud computer posts from a data center by default, which can look different from a normal home connection. Adding a cheap residential proxy (a couple of dollars a month) makes your Facebook posts leave from a home-style address instead, much like they do when you run Influencer Butler on your own computer at home. This covers Facebook only. Instagram, Messenger, and the Amazon butlers still connect from the cloud computer's own address.
What if I would rather use the computer I already own? That works too. You can leave your home computer on and remote into it from your phone, with a battery backup so a power outage does not stop it. Here is that setup: Keep your Butler running while you travel.
The takeaway
If your computer is slow or you travel a lot, you no longer have to babysit Influencer Butler on a laptop that keeps getting interrupted. For free, you can put it on an always-on cloud computer that runs your butlers around the clock. Set it up once, close your laptop, and let it work while you live your life.
New to Influencer Butler? Start your free 14-day trial and then park it on a free cloud PC so it never stops working for you.
Share this post
Tools and guides for this topic
Put this into practice with the tools and walkthroughs that match what you just read.
Let a butler handle the busywork.
Influencer Butler automates the repetitive parts of running your creator business, from accepting Creator Connections campaigns to catching price drops and keeping your outreach moving. Try it free for 14 days.
Start your free trial